How to Create Microservices — A Practical Guide Using Go
Janishar Ali
•
15 Jan 2026

Microservices have puzzled many developers, particularly when they move out of theory and into implementation. In almost all cases a developer who has worked on a monolithic system is introduced to the concept of distributed systems a.k.a microservices when he/she gets into a company that has scaled up. The work of that particular developer initially revolves around a single service which in effect is a monolith, after some experience that developer begins to take on the journey of understanding several such monoliths working together to create a network of linked services.
Note: Monolithic architectures are effective and should be a starting point. It makes sense to keep things simple and manageable when we start. We do not have to rush into applying microservices everywhere.
Let’s first understand the need for microservices.
The simplest structure of an API server (monolithic) is an application connected with databases and deployed on a server.
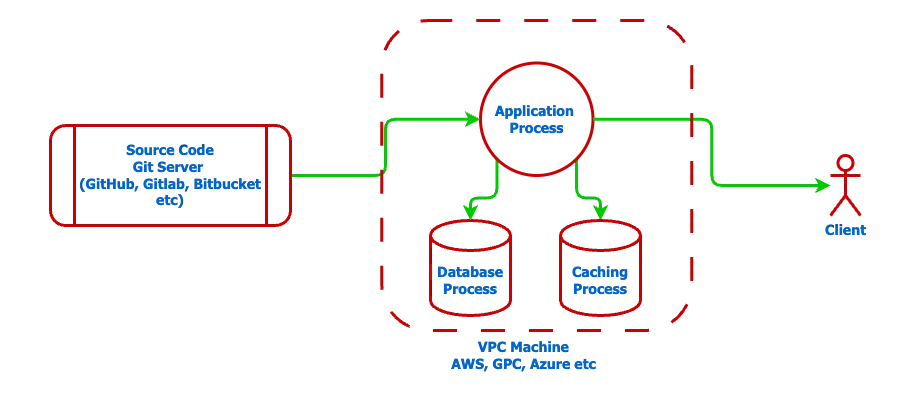
- The source code contains all the application logic.
- A single server hosts all the infrastructure.
- It leads to downtime when we redeploy our code changes
You can scale this server by adding more RAM, CPU cores, storage, etc as your client’s needs grow. But it will hit a ceiling for performance: latency(time taken to process and return a client request) and throughput (number of such requests processed in a given time frame, say 1 sec).
You can design this system better by making more copies of the application server and distributing the traffic among them. It will also result in introducing more complexities in the system and deployment.
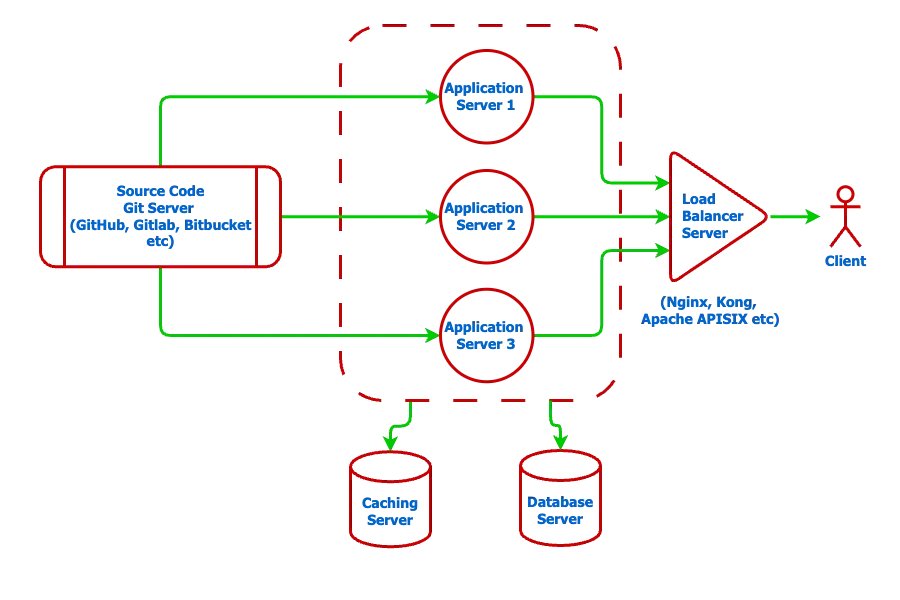
- Now you have 6 servers: 3 copies of the application, 1 database, 1 caching, and 1 traffic distributor known as the load balancer.
- It will increase the service availability, and the code can be redeployed without downtime.
- The latency will decrease and throughput will increase significantly.
- You can scale up different servers with increased demand.
- It will also cost much more, as you will have to pay for additional servers.
- Now, the management of different services will become an important job.
The load balancer server takes a request and forwards it to one of the application servers. This ensures optimum utilization of the application server replicas.
Limitations of this solution:
- The application codebase will grow and become unmanageable over time.
- Git conflict resolution between multiple teams working on different features will delay the shipment.
- Few features might need more resources than others and hence will be difficult to scale those individual features separately.
This is where you might want to break the application into multiple features or services. Each service can be developed, deployed, and scaled separately. Services also enjoy the freedom of choosing its own tech stack. But it will introduce much more complexities in our infrastructure and development.
Let’s take an example of a monolithic project of a blogging platform [link to my article and GitHub repo] and convert it into microservices.
The blogging platform example (or any API service in general) will have these components:
- API key (optional): restrict access based on a secret key
- Public API: accessible without any user verification
- Authentication: accessible only to registered users
- Authorization: users with a given role can only access a particular API
- Features: APIs for a particular resource with business logic
Now, we want to break the blogging platform features into independent codebases. In this example, we will break it into 2 services: Auth service and Blog service.
Auth service responsibility:
- API Key validation
- Signup, login, and logout
- User details
- JWT token generation and validation
Blog Service responsibility:
- Blog Details
- Blog lists
- Author — blog creation
- Editor — blog publish
Now, the million-dollar question is how can we write such a codebase and connect all the components to make our services functional?
Let’s see a solution diagram first:
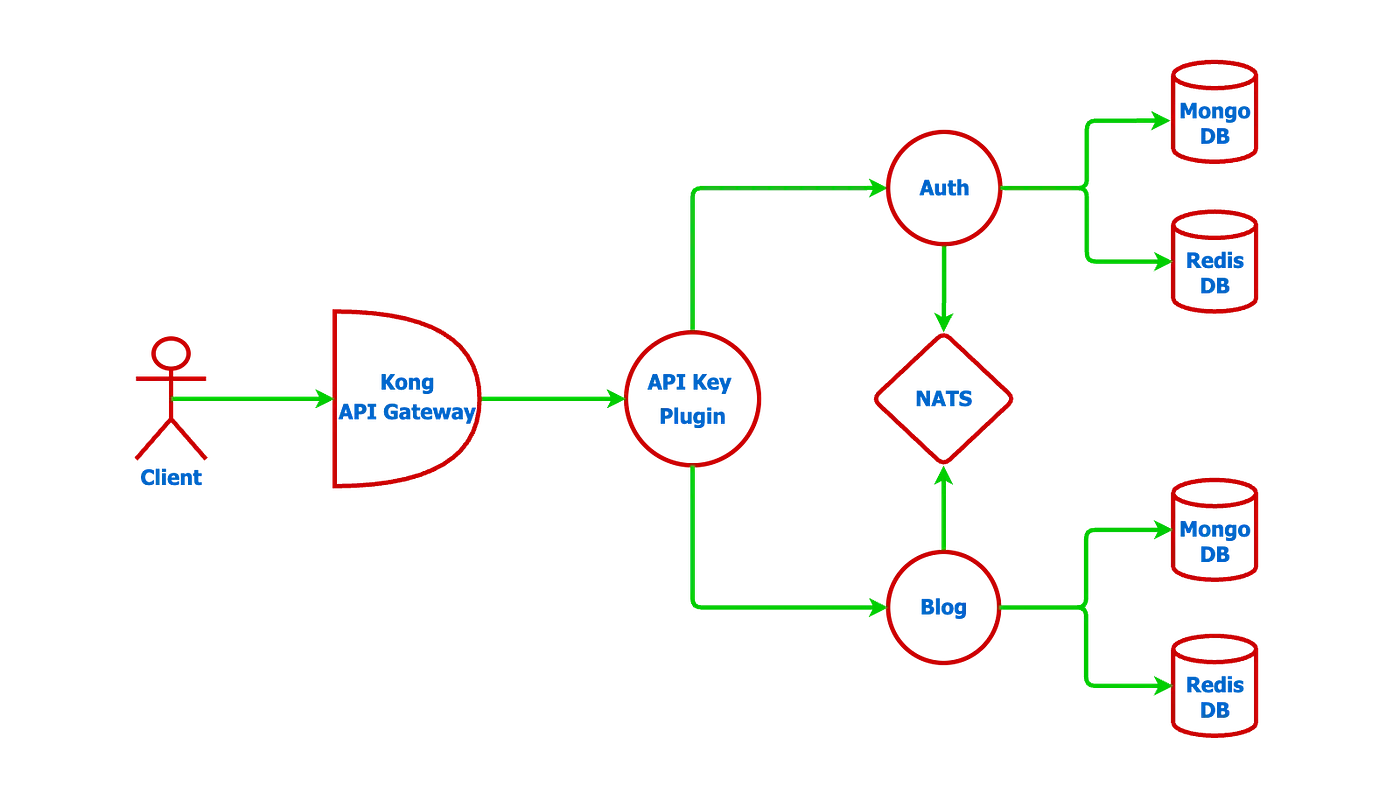
- Kong is an API gateway that you saw as a load balancer earlier. It helps in service discovery and load balancing. Plugins can be added to pre-process or post-process a request, i.e. any centralized validation or modification to a request can be done at the level of kong.
- Auth Service instance has its dedicated database for documents and caching
- Blog Service instance also has its dedicated database for documents and caching.
In general, each service is made independent and isolated as much as possible. They have dedicated databases.
In this implementation, we have to solve for information sharing among services.
- User table exists in the Auth service and the Blog service may need user information for Author and Editor APIs.
- We want to give freedom to each service to define its own public, authenticated, and authorized APIs. These logics live in the Auth service and the blog service needs to ask for it.
To enable services communication, we have a couple of popular solutions:
- HTTP: A service calls the internal APIs of another service (discovers other service via API gateway)
- Messaging system: NATS, Kafka, MQTT, etc.
- RPC (remote procedural call) like gRPC
NATS is used in this project, which is a simple message queue. Services connect with the NATS server and can send and receive messages over a topic. The project is built on the Request-Response feature provided by NATS. This enables a service to ask for information and receive it in a blocking call.
Before I get into the exact code implementation, let’s see how we can scale each service.
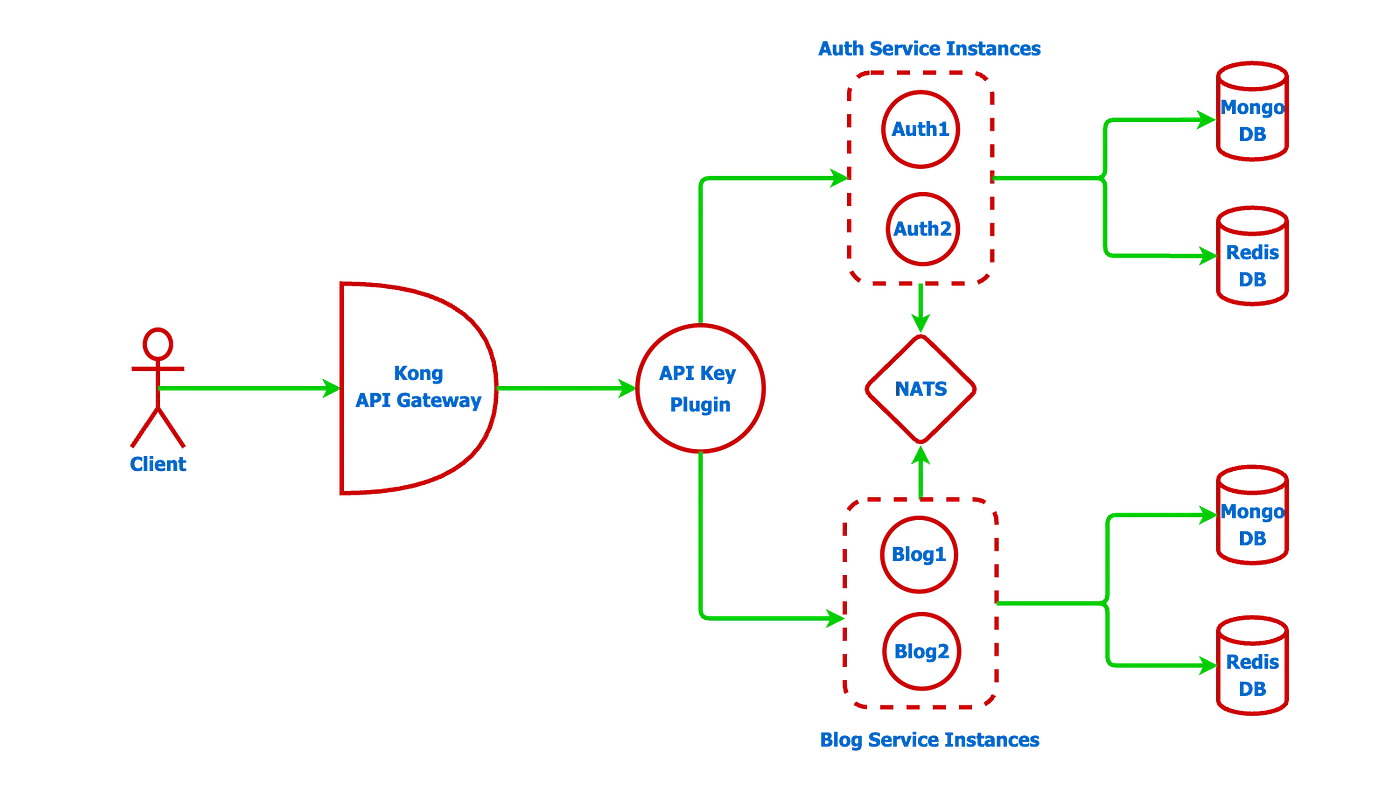
We can create as many instances of Auth service and Blog service as we need. Kong will be responsible for routing the requests to these instances.
Now, let’s get into the codebase.
Before we begin I will encourage you to understand the monolith Blogging platform code [link to my article]. I have also open source the Go backend framework — goserve on which this example is built.
The code used in this microservices example can be found at the GitHub Repo: gomicro. I have put all the components in a single repository so that it becomes simpler to deploy and learn. This is exactly the way microservices can effectively be learned, thus removing the chaos and complexities of getting started.
kong (load balanced version)
kong/kong-load-balanced.yml file defines the services and plugins for our blogging platform.
- services: It defines the url and name for the auth and blog services. [domain]/api routes the request to either auth1 or auth2 docker instances. [domain]/blog routes the request to either blog1 or blog2 docker instance.
- upstream: It defines the load balancing between the auth1:8000 and auth2:8000, blog1:8000 and blog2:8000.
- plugins: I have created a simple go plugin at kong/apikey_auth_plugin/main.go. It calls one of the verification_urls randomly to verify apikey and then forwards the successful request to the corresponding services.
_format_version: "2.1"
_transform: true

services:
  - name: auth
    url: http://auth_upstream
    routes:
      - name: auth
        paths:
          - /auth
  - name: blog
    url: http://blog_upstream
    routes:
      - name: blog
        paths:
          - /blog

upstreams:
  - name: auth_upstream
    targets:
      - target: auth1:8000
        weight: 100
      - target: auth2:8000
        weight: 100

  - name: blog_upstream
    targets:
      - target: blog1:8000
        weight: 100
      - target: blog2:8000
        weight: 100

plugins:
  - name: apikey-auth-plugin
    config:
      verification_urls:
        - http://auth1:8000/verify/apikey
        - http://auth2:8000/verify/apikey
Note: auth1:8000, auth2:8000, blog1:8000, and blog2:8000 urls are internal docker network urls. If you want to see an example without load balancing check out the kong.yml file.
The kong/Dockerfile-load-balanced file defines the steps to create and setup the kong docker image
This project implements 2 services: auth_service and blog_service. Auth service is based on postgres db and blog service used mongo db. Both these services talks to each other using NATS.
Auth Service
This code is based on the goserve micro framework. We can get more details on the goserve in this article.
Note: If you are coming from goserve framework for monolithic go architecture, notice these changes in microservices:
- micro.Module[module] should used for instance creation in place of network.Module[module]
- micro.NewRouter should be used in place of network.NewRouter
- micro.Controller should be used in place of network.Controller
Let’s go through the controller: auth_service/controller.go
- MountRoutes: It provides the gin.RouterGroup to add the REST API endpoints to be called by a client. The authentication and authorization middleware can be added as per the endpoint’s requirements.
- MountNats: It provides micro.NatsGroup to add the nats endpoints that can be called by other services. Note:
AddEndpoint("authentication", ..)adds to the nats topic auth.authentication.
package auth

import (
  "github.com/afteracademy/gomicro/auth-service/api/auth/dto"
  "github.com/afteracademy/gomicro/auth-service/api/auth/message"
  "github.com/afteracademy/gomicro/auth-service/api/user"
  "github.com/afteracademy/gomicro/auth-service/common"
  "github.com/afteracademy/gomicro/auth-service/utils"
  "github.com/afteracademy/goserve/v2/micro"
  "github.com/afteracademy/goserve/v2/network"
  "github.com/gin-gonic/gin"
)

type controller struct {
  micro.Controller
  common.ContextPayload
  service     Service
  userService user.Service
}

func NewController(
  authProvider network.AuthenticationProvider,
  authorizeProvider network.AuthorizationProvider,
  service Service,
  userService user.Service,
) micro.Controller {
  return &controller{
    Controller: micro.NewController("/", authProvider, authorizeProvider),
    ContextPayload: common.NewContextPayload(),
    service:        service,
    userService:    userService,
  }
}

func (c *controller) MountNats(group micro.NatsGroup) {
  group.AddEndpoint("authentication", micro.NatsHandlerFunc(c.authenticationHandler))
  group.AddEndpoint("authorization", micro.NatsHandlerFunc(c.authorizationHandler))
}

func (c *controller) authenticationHandler(req micro.NatsRequest) {
  text, err := micro.JsonToMsg[message.Text](req.Data())
  if err != nil {
    micro.RespondNatsError(req, err)
    return
  }

  user, _, err := c.service.Authenticate(text.Value)
  if err != nil {
    micro.RespondNatsError(req, err)
    return
  }

  micro.RespondNatsMessage(req, message.NewUser(user))
}


func (c *controller) authorizationHandler(req micro.NatsRequest) {
  userRole, err := micro.JsonToMsg[message.UserRole](req.Data())
  if err != nil {
    micro.RespondNatsError(req, err)
    return
  }

  user, err := c.userService.FetchUserById(userRole.User.ID)
  if err != nil {
    micro.RespondNatsError(req, err)
    return
  }

  err = c.service.Authorize(user, userRole.Roles...)
  if err != nil {
    micro.RespondNatsError(req, err)
    return
  }

  micro.RespondNatsMessage(req, message.NewUser(user))
}

func (c *controller) MountRoutes(group *gin.RouterGroup) {
  group.GET("/verify/apikey", c.verifyApikeyHandler)
  group.POST("/signup/basic", c.signUpBasicHandler)
  group.POST("/signin/basic", c.signInBasicHandler)
  group.POST("/token/refresh", c.tokenRefreshHandler)
  group.DELETE("/signout", c.Authentication(), c.signOutBasic)
}

func (c *controller) verifyApikeyHandler(ctx *gin.Context) {
  key := ctx.GetHeader(network.ApiKeyHeader)
  if len(key) == 0 {
    network.SendUnauthorizedError(ctx, "permission denied: missing x-api-key header", nil)
    return
  }

  _, err := c.service.FetchApiKey(key)
  if err != nil {
    network.SendForbiddenError(ctx, "permission denied: invalid x-api-key", err)
    return
  }

  network.SendSuccessMsgResponse(ctx, "success")
}

func (c *controller) signUpBasicHandler(ctx *gin.Context) {
  body, err := network.ReqBody[dto.SignUpBasic](ctx)
  if err != nil {
    network.SendBadRequestError(ctx, err.Error(), err)
    return
  }

  data, err := c.service.SignUpBasic(body)
  if err != nil {
    network.SendMixedError(ctx, err)
    return
  }

  network.SendSuccessDataResponse(ctx, "success", data)
}


func (c *controller) signInBasicHandler(ctx *gin.Context) {
  body, err := network.ReqBody[dto.SignInBasic](ctx)
  if err != nil {
    network.SendBadRequestError(ctx, err.Error(), err)
    return
  }

  dto, err := c.service.SignInBasic(body)
  if err != nil {
    network.SendMixedError(ctx, err)
    return
  }

  network.SendSuccessDataResponse(ctx, "success", dto)
}

func (c *controller) signOutBasic(ctx *gin.Context) {
  keystore := c.MustGetKeystore(ctx)

  err := c.service.SignOut(keystore)
  if err != nil {
    network.SendInternalServerError(ctx, "something went wrong", err)
    return
  }

  network.SendSuccessMsgResponse(ctx, "signout success")
}

func (c *controller) tokenRefreshHandler(ctx *gin.Context) {
  body, err := network.ReqBody[dto.TokenRefresh](ctx)
  if err != nil {
    network.SendBadRequestError(ctx, err.Error(), err)
    return
  }

  authHeader := ctx.GetHeader(network.AuthorizationHeader)
  accessToken := utils.ExtractBearerToken(authHeader)

  dto, err := c.service.RenewToken(body, accessToken)
  if err != nil {
    network.SendMixedError(ctx, err)
    return
  }

  network.SendSuccessDataResponse(ctx, "success", dto)
}
We can send a request message and receive a response message or error through nats via micro package.
Example: auth_service/api/auth/message/user_role.go and blog_service/api/auth/message/user_role.go
package message

type UserRole struct {
 User  *User    `json:"user"`
 Roles []string `json:"roles"`
}

func NewUserRole(user *User, roles ...string) *UserRole {
 return &UserRole{
  User:  user,
  Roles: roles,
 }
}
In order to authorize inside blog_service, auth_service/auth/controller.go is called on the topic auth.authorization. Auth controller verifies the roles and returns User message or error to the blog_service.
blog_service/api/auth/message/user.go and auth_service/api/auth/message/user.go
package message

import (
  "github.com/afteracademy/gomicro/auth-service/api/user/model"
  "github.com/google/uuid"
)

type User struct {
  ID            uuid.UUID `json:"id" validate:"required,uuid"`
  Name          string    `json:"name" validate:"required"`
  Email         string    `json:"email" validate:"required,email"`
  ProfilePicURL *string   `json:"profilePicUrl,omitempty" validate:"omitempty,url"`
}

func NewUser(user *model.User) *User {
  return &User{
    ID:            user.ID,
    Name:          user.Name,
    Email:         user.Email,
    ProfilePicURL: user.ProfilePicURL,
  }
}
Rest of the code is similar to the goserve monolithic example
Blog Service
This code is also based on the goserve micro framework. You can get more details on the goserve in this article.
Its authentication and authorization middleware asks the auth_service controller that we saw above via blog_service/auth/service.go
authRequestBuilder: micro.NewRequestBuilder[message.User](natsClient, "auth.authentication")
authRequestBuilder helps in sending UserRole message on nats auth.authentication topic and receive the User message in response.
blog_service/auth/service.go
package auth

import (
  "github.com/afteracademy/gomicro/blog-service/api/auth/message"
  "github.com/afteracademy/goserve/v2/micro"
  "github.com/google/uuid"
)

const NATS_TOPIC_AUTH = "auth.authentication"
const NATS_TOPIC_AUTHZ = "auth.authorization"
const NATS_TOPIC_USERPROFILE = "auth.profile.user"

type Service interface {
  Authenticate(token string) (*message.User, error)
  Authorize(user *message.User, roles ...string) error
  FindUserPublicProfile(userId uuid.UUID) (*message.User, error)
}

type service struct {
  natsClient micro.NatsClient
}

func NewService(natsClient micro.NatsClient) Service {
  return &service{
    natsClient: natsClient,
  }
}

func (s *service) Authenticate(token string) (*message.User, error) {
  msg := message.NewText(token)
  return micro.RequestNats[message.Text, message.User](s.natsClient, NATS_TOPIC_AUTH, msg)
}

func (s *service) Authorize(user *message.User, roles ...string) error {
  msg := message.NewUserRole(user, roles...)
  _, err := micro.RequestNats[message.UserRole, message.User](s.natsClient, NATS_TOPIC_AUTHZ, msg)
  return err
}

func (s *service) FindUserPublicProfile(userId uuid.UUID) (*message.User, error) {
  msg := message.NewText(userId.String())
  return micro.RequestNats[message.Text, message.User](s.natsClient, NATS_TOPIC_USERPROFILE, msg)
}
Rest of the code is similar to the goserve monolithic example
Docker compose
The docker-compose-load-balanced.yml file defines all the services and configurations to create and run docker containers. The list of services is as follows:
- kong
- auth1 and auth2
- blog1 and blog 2
- mongo
- redis
- nats
name: "gomicro_load_balanced"
services:
  kong:
    build:
      context: ./kong
      dockerfile: ./Dockerfile-load-balanced
    user: root
    restart: unless-stopped
    ports:
      - "8000:8000"
      - "8443:8443"
      - "8001:8001"
      - "8444:8444"
    depends_on:
      - auth1
      - auth2
      - blog1
      - blog2
    networks:
      - gomicro-network


  # Auth Service Instances for Load Balancing
  auth1:
    build:
      context: ./auth_service
      dockerfile: Dockerfile
    restart: unless-stopped
    env_file:
      - ./auth_service/.env
    depends_on:
      postgres:
        condition: service_healthy
      redis-auth:
        condition: service_started
      nats:
        condition: service_started
    networks:
      - gomicro-network


  auth2:
    build:
      context: ./auth_service
      dockerfile: Dockerfile
    restart: unless-stopped
    env_file:
      - ./auth_service/.env
    depends_on:
      postgres:
        condition: service_healthy
      redis-auth:
        condition: service_started
      nats:
        condition: service_started
    networks:
      - gomicro-network


  # Blog Service Instances for Load Balancing
  blog1:
    build:
      context: ./blog_service
      dockerfile: Dockerfile
    restart: unless-stopped
    env_file:
      - ./blog_service/.env
    depends_on:
      mongo:
        condition: service_started
      redis-blog:
        condition: service_started
      nats:
        condition: service_started
    networks:
      - gomicro-network


  blog2:
    build:
      context: ./blog_service
      dockerfile: Dockerfile
    restart: unless-stopped
    env_file:
      - ./blog_service/.env
    depends_on:
      mongo:
        condition: service_started
      redis-blog:
        condition: service_started
      nats:
        condition: service_started
    networks:
      - gomicro-network


  # Auth Service Database (PostgreSQL)
  postgres:
    image: postgres:18.1
    restart: unless-stopped
    env_file: ./auth_service/.env
    ports:
      - '5432:5432'
    volumes:
      - ./auth_service/.setup/auth-init-pg-db.sql:/docker-entrypoint-initdb.d/auth-init-pg-db.sql:ro
      - ./auth_service/.setup/auth-init-pg-test-db.sql:/docker-entrypoint-initdb.d/auth-init-pg-test-db.sql:ro
      - postgres-data:/var/lib/postgresql
    healthcheck:
      test: ["CMD-SHELL", "pg_isready -U $${DB_USER} -d $${DB_NAME}"]
      interval: 10s
      timeout: 5s
      retries: 5
    networks:
      - gomicro-network

  # Database migration for auth service (test database)
  migrate-auth-test-db:
    image: migrate/migrate
    env_file: ./auth_service/.test.env
    volumes:
      - ./auth_service/migrations:/migrations
    depends_on:
      postgres:
        condition: service_healthy
    entrypoint: ["/bin/sh", "-c"]
    command:
      - |
        migrate -path /migrations -database "postgres://$${DB_USER}:$${DB_USER_PWD}@postgres:5432/$${DB_NAME}?sslmode=disable" up
    networks:
      - gomicro-network
    restart: on-failure


  # Blog Service Database (MongoDB)
  mongo:
    image: mongo:8.0.9
    restart: unless-stopped
    env_file: ./blog_service/.env
    ports:
      - '27017:27017'
    command: mongod --bind_ip_all
    volumes:
      - ./blog_service/.setup/blog-init-mongo.js:/docker-entrypoint-initdb.d/blog-init-mongo.js:ro
      - mongo-data:/data/db
    networks:
      - gomicro-network


  # Redis for Auth Service
  redis-auth:
    image: redis:8.4.0
    restart: unless-stopped
    env_file: ./auth_service/.env
    ports:
      - '6379:6379'
    command: redis-server --bind 0.0.0.0 --save 20 1 --loglevel warning --requirepass changeit
    volumes:
      - redis-auth-data:/data
    healthcheck:
      test: ["CMD", "redis-cli", "--raw", "incr", "ping"]
      interval: 10s
      timeout: 3s
      retries: 5
    networks:
      - gomicro-network


  # Redis for Blog Service
  redis-blog:
    image: redis:8.4.0
    restart: unless-stopped
    env_file: ./blog_service/.env
    ports:
      - '6380:6379'
    command: redis-server --bind 0.0.0.0 --save 20 1 --loglevel warning --requirepass changeit
    volumes:
      - redis-blog-data:/data
    healthcheck:
      test: ["CMD", "redis-cli", "--raw", "incr", "ping"]
      interval: 10s
      timeout: 3s
      retries: 5
    networks:
      - gomicro-network


  # Message broker for inter-service communication
  nats:
    image: nats:2.12.3
    restart: unless-stopped
    env_file: .env
    ports:
      - "${NATS_CLIENT_PORT:-4222}:4222"
      - "${NATS_MANAGEMENT_PORT:-8222}:8222"
    networks:
      - gomicro-network


networks:
  gomicro-network:
    driver: bridge


volumes:
  postgres-data:
  mongo-data:
  redis-auth-data:
  redis-blog-data:
Instructions to build and run gomicro
# vscode is the recommended editor - dark theme

# Get the repo
git clone https://github.com/afteracademy/gomicro.git

# Generate RSA Keys
go run .tools/rsa/keygen.go

# Create .env files
go run .tools/copy/envs.go

# Run docker compose
docker-compose -f docker-compose-load-balanced.yml up --build
You will be able to access the api from http://localhost:8000
Documentation
Read the complete project documentation and learn the GoServe framework architecture at https://goserve.afteracademy.com
Now, you can explore the repo in detail and I am sure you will find it a good time-spending exercise.
You now have a working knowledge of creating and deploying microservices. Microservices is a distributed system design and its implementation will require many more considerations, like circuit breaker, timeouts, etc, which You can explore further. One more important point, microservices are difficult to debug and monitor, so it will be worth looking into those concepts. I will be writing about them in future articles.
Thanks for reading this article. Be sure to share this article if you found it helpful. It would let others get this article and spread the knowledge. Also, putting a clap will motivate me to write more such articles
Find more about me here
Written by Janishar Ali
Share this article and spread the knowledge
Read Similar Articles
AfterAcademy Tech
RESTful API Using Node and Express
In this tutorial, we will learn to build the RESTful API using Node and Express. The goal is to make you comfortable in building your RESTful API with Node.js and Express. At the end of this blog, you will be able to build your REST APIs using Node.js and Express.
AfterAcademy Tech
Reverse a Stack Using Recursion
Given a stack of integers st, write a program to reverse the stack using recursion. This problem will clear the concept of recursion.
AfterAcademy Tech
Sort A Stack Using Another Stack
Given a stack, you have to sort it in ascending order. You can use another stack if you need auxiliary space. The problem is asked in Google, Microsoft and Amazon and requires knowledge of Stack and recursion to solve it.
AfterAcademy Tech
Implement Queue Using Stack-Interview Problem
This is an interview problem asked in companies like Microsoft, Amazon, Adobe, Flipkart, etc. Here, we need to implement Queue data structure using another data structure Stack. This problem is meant for testing the data structure knowledge.