Deploy API Server on AWS 101 DevOps Tutorial
Janishar Ali
•
01 Jul 2026
Youtube Video - AWS Deployment
Deploy a Production Node.js Backend on AWS | MongoDB, Redis, Nginx Load Balancer & Custom Domain (DevOps Tutorial)
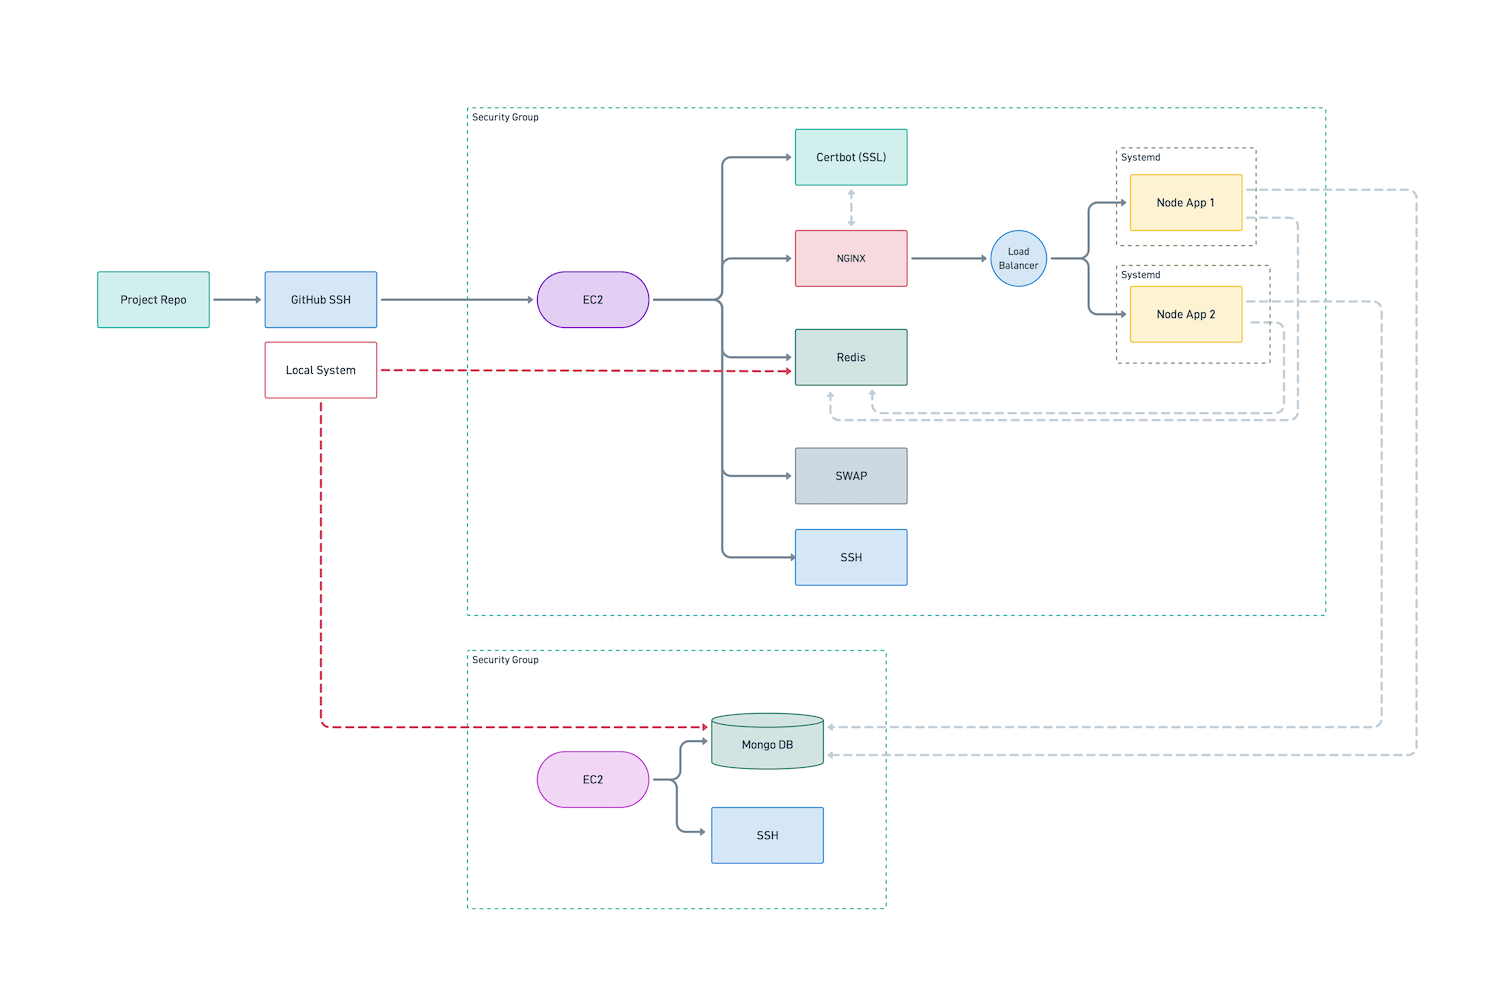
Ready to take a Node.js API from your laptop to a real, production-grade setup on AWS? In this end-to-end tutorial, we deploy a full backend architecture on Amazon EC2—database, cache, load-balanced app servers, a custom domain, and HTTPS—the way it's actually done in production.
We start by walking through the architecture, then build it piece by piece: a dedicated MongoDB server, a separate API server running two load-balanced Node.js instances behind Nginx, Redis for caching, systemd to keep everything running, and Certbot for free SSL. By the end, your API is live on a custom domain over HTTPS.
This one's for developers who already know some Node.js and want to level up their DevOps and deployment skills.
CHAPTERS
00:00 – Part 1: What we're building
01:04 – Architecture design
10:16 – GitHub API project repo
11:55 – Amazon AWS overview
12:45 – Part 2: MongoDB server — EC2 setup (Ubuntu, ARM t4g)
24:17 – SSH login & configuring swap
33:35 – Installing MongoDB 8.3 (ARM64 / noble)
40:06 – Configuring mongod (cache, bindIp, auth, users)
45:44 – SSH tunnel + connecting with MongoDB Compass
49:34 – Part 3: API server — EC2 & swap
54:29 – Installing & securing Redis
57:49 – Installing Nginx + a custom 502 error page
1:01:16 – Setting up GitHub and cloning repo
1:06:54 – Installing Node.js via NPM
1:08:43 – Setting up API project
1:11:42 – systemd services for both API instances
1:21:50 – Nginx reverse proxy + load balancing
1:28:43 – Pointing a custom domain via GoDaddy (A record)
1:30:31 – Free SSL with Certbot
1:33:28 – Seeding Database and API Testing
1:36:57 – How to deploy API updates
1:38:23 – Conclusion
1:39:21 – End
WHAT YOU'LL LEARN
- Designing a multi-server backend architecture on AWS EC2
- Installing and hardening MongoDB and Redis
- Load balancing two Node.js instances behind Nginx
- Running apps as systemd services that restart on failure
- Connecting a custom domain and enabling HTTPS with Certbot
Architecture Discussion
GitHub Project Repository
https://github.com/afteracademy/nodejs-backend-architecture-typescript
Postman API Demo
https://documenter.getpostman.com/view/1552895/2s8Z6u4a6N
Amazon AWS
Mongo DB
EC2 - Creation
- Region - Singapore
- Ubuntu t4g.small Instance 24.04.4 LTS
- 20 GB EBS SSD
- Security Group
- Key generation and safely download
- SSH login as root
# 400 means the owner can only read the file — nothing else, for anyone.
chmod 400 ~/PATH_TO_AWS_FILE.pem

ssh -i ~/PATH_TO_AWS_FILE.pem ubuntu@EC2_PUBLIC_IP_ADDRESS
SWAP
# Show any swap space that is currently active (empty output means none)
sudo swapon --show

# Allocate a 4 GB file named /swapfile to be used as swap
sudo fallocate -l 4G /swapfile

# Verify the file was created and check its size
ls -lh /swapfile

# Restrict permissions so only root can read/write the swap file (security requirement)
sudo chmod 600 /swapfile

# Confirm the permissions changed to -rw-------
ls -lh /swapfile

# Format the file as a Linux swap area
sudo mkswap /swapfile

# Enable the swap file so the system starts using it immediately
sudo swapon /swapfile

# Confirm the swap file is now active
sudo swapon --show

# Back up the current fstab before editing
sudo cp /etc/fstab /etc/fstab.bak

# Append an entry so the swap file is re-enabled automatically on every boot
echo '/swapfile none swap sw 0 0' | sudo tee -a /etc/fstab
Install Mongo db
sudo system# === MONGODB 8.3 SETUP (Ubuntu 24.04 LTS "noble", ARM64 / EC2) ===

# Confirm the OS — Codename should read "noble"
lsb_release -a

# Refresh package lists and apply available upgrades (-y auto-confirms)
sudo apt update && sudo apt upgrade -y

# Tools needed to fetch and verify the MongoDB repo over HTTPS
sudo apt install -y curl gnupg ca-certificates

# Import the signing key. NOTE: 8.3 is signed with the 8.0 key — this is correct,
# do NOT look for a "server-8.3.asc" (it doesn't exist). --yes allows safe re-runs.
curl -fsSL https://pgp.mongodb.com/server-8.0.asc | \
  sudo gpg --dearmor --yes -o /usr/share/keyrings/mongodb-server-8.0.gpg

# Register the MongoDB 8.3 repo for noble/arm64.
# 'signed-by' must match the keyring filename written above (still the 8.0 keyring).
echo "deb [arch=arm64 signed-by=/usr/share/keyrings/mongodb-server-8.0.gpg] \
https://repo.mongodb.org/apt/ubuntu noble/mongodb-org/8.3 multiverse" | \
  sudo tee /etc/apt/sources.list.d/mongodb-org-8.3.list

# Pull in the new repo's package list
sudo apt update

# List the exact 8.3.x patch versions APT can see, then pin to a real one below
apt-cache madison mongodb-org

# Install pinned components. Replace 8.3.0 with whatever madison shows.
# The shell is 'mongodb-mongosh' (its own ~2.x versioning — do NOT pin to 8.3.x).
sudo apt install -y \
  mongodb-org=8.3.4 \
  mongodb-org-database=8.3.4 \
  mongodb-org-server=8.3.4 \
  mongodb-mongosh \
  mongodb-org-mongos=8.3.4 \
  mongodb-org-tools=8.3.4

# Prevent apt from silently upgrading MongoDB later
sudo apt-mark hold \
  mongodb-org \
  mongodb-org-database \
  mongodb-org-server \
  mongodb-org-mongos \
  mongodb-org-tools

# Reload systemd so it sees the new mongod unit (daemon-reload, not daemon-reexec)
sudo systemctl daemon-reload

# Start now and enable on boot
sudo systemctl start mongod
sudo systemctl enable mongod

# Verify it came up cleanly before connecting
sudo systemctl status mongod --no-pager

# Open the shell (these run INSIDE mongosh, not bash):
mongosh
#   db.version()   <- run at the mongosh prompt to confirm the server version
Configure Mongo db
# Where and how to store data
storage:
  dbPath: /var/lib/mongodb
  wiredTiger:
    engineConfig:
      # IMPORTANT on small ARM instances (t4g.micro/small/medium):
      # the default cache is (RAM - 1GB) / 2, which can trigger the OOM killer.
      # Cap it explicitly — this is also why your earlier swapfile helps.
      # Example for a ~2GB instance; tune to your instance size:
      cacheSizeGB: 0.5

# Log file — must be owned by mongodb:mongodb
systemLog:
  destination: file
  logAppend: true
  path: /var/log/mongodb/mongod.log

# Network — DEFAULT is localhost-only (safest)
net:
  port: 27017
  bindIp: 127.0.0.1,<PRIVATE_SELF_EC2_IP>
  # If your app connects from another host, list that host's private IP,
  # e.g. "127.0.0.1,10.0.1.5". Avoid 0.0.0.0 unless your EC2 security group
  # restricts port 27017 to trusted sources AND auth is enabled (below).

# Strongly recommended once you've created an admin user:
security:
  authorization: enabled

processManagement:
  timeZoneInfo: /usr/share/zoneinfo
sudo systemctl restart mongodMongo Compass
https://www.mongodb.com/try/download/compass
API Server
Redis Server Installation
# === REDIS SETUP (Ubuntu / EC2) ===

# Refresh the package lists so apt knows about the latest available versions
sudo apt update

# Install the Redis server package (-y auto-confirms the prompt)
sudo apt install redis-server -y

# Enable Redis to start automatically on every boot
sudo systemctl enable redis-server

# Check that the service is running (look for "active (running)")
sudo systemctl status redis-server

# Edit the Redis config: set a password (requirepass), bind address, etc.
# NOTE: see the password caveat at the bottom — wrap it in quotes here.
sudo nano /etc/redis/redis.conf

# (In the editor you set the password — shown here as "changeit")
Password: changeit

# View the last 100 log lines for your app service, e.g. to confirm it
# reconnected to Redis after the change
journalctl -u API_APP_SERVICE_NAME -n 100

# Restart Redis to apply the config edits.
# WARNING: service name mismatch — you enabled/checked "redis-server" but
# restart "redis". On Ubuntu the unit is "redis-server" (with "redis" usually
# an alias). To be safe and consistent, use:  sudo systemctl restart redis-server
sudo systemctl restart redis

# Authenticate with -a <password> and test connectivity (expect a "PONG" reply)
redis-cli -a changed ping

# Authenticate and dump server stats/configuration info
redis-cli -a changed INFO
NGINX
sudo apt update && sudo apt upgrade -y
sudo apt install nginx -y
sudo systemctl start nginx
sudo systemctl enable nginx

# Production safe guards in future videos - rate limiting, connection pool etc
API Service
# clone repository
git clone git@github.com:afteracademy/nodejs-backend-architecture-typescript.git

# rename the repo
mv nodejs-backend-architecture-typescript apis-1

# install dependencies and create secret files
npm install

# check npm build
npm run build

# change the .env file
DB_HOST=PRIVATE_MONGO_SERVER_IP_ADDRESS
DB_NAME=prod-db
DB_USER=prod-db-user
REDIS_HOST=localhost

# create another instance of the app
cp -r apis-1 apis-2
Systemd config
# Add systemd files
cd /etc/systemd/system

sudo vi apis-1.service
###############################
[Unit]
Description=API 1 Service
After=network.target

[Service]
Type=simple
WorkingDirectory=/var/www/apis-1
ExecStart=/bin/bash -c 'export PATH=/home/ubuntu/.nvm/versions/node/v24.18.0/bin:$PATH && npm start'
Restart=always
RestartSec=10
Environment=NODE_ENV=production
Environment=PORT=3000
User=ubuntu
Group=ubuntu

[Install]
WantedBy=multi-user.target
###############################

sudo cp apis-1.service apis-2.service
sudo vi apis-2.service

###############################
[Unit]
Description=API 2 Service
After=network.target

[Service]
Type=simple
WorkingDirectory=/var/www/apis-2
ExecStart=/bin/bash -c 'export PATH=/home/ubuntu/.nvm/versions/node/v24.18.0/bin:$PATH && npm start'
Restart=always
RestartSec=10
Environment=NODE_ENV=production
Environment=PORT=3001
User=ubuntu
Group=ubuntu

[Install]
WantedBy=multi-user.target
###############################

sudo systemctl start apis-1
sudo systemctl status apis-1

sudo systemctl start apis-2
sudo systemctl status apis-2

nc -v localhost 3000
nc -v localhost 3001
Proxy server with load balancer
cd /etc/nginx/sites-available/
sudo nano api.aibacuslab.com
upstream api_server {
  server 127.0.0.1:3000 max_fails=3 fail_timeout=10s;
  server 127.0.0.1:3001 max_fails=3 fail_timeout=10s;
}

server {
  server_name api.aibacus.com;

  client_max_body_size 10M;

  error_page 502 /custom_errors/502.html;

  location /custom_errors/ {
    alias /var/www/html/;
  }

  location / {
    proxy_pass http://api_server;
    proxy_http_version 1.1;

    proxy_set_header Host $host;
    proxy_set_header X-Real-IP $remote_addr;
    proxy_set_header X-Forwarded-For $proxy_add_x_forwarded_for;
    proxy_set_header X-Forwarded-Proto $scheme;

    proxy_next_upstream error timeout invalid_header http_500 http_502 http_503 http_504;
  }
}
sudo ln -s /etc/nginx/sites-available/api.aibacus.com \
/etc/nginx/sites-enabled/api.aibacus.com

sudo nginx -t
sudo systemctl reload nginx
Domain Setup
Create A record with GoDaddy with public IP of the api server
SSL - Certbot
# CERTBOT
sudo apt install -y certbot python3-certbot-nginx
certbot --version

sudo certbot --nginx -d api.aibacuslab.com
sudo certbot renew --dry-run
Written by Janishar Ali
Share this article and spread the knowledge
Read Similar Articles
AfterAcademy Tech
RESTful API Using Node and Express
In this tutorial, we will learn to build the RESTful API using Node and Express. The goal is to make you comfortable in building your RESTful API with Node.js and Express. At the end of this blog, you will be able to build your REST APIs using Node.js and Express.
AfterAcademy Tech
What exactly is API?
In this blog, we will learn about API. We will see what exactly is API and by the end of this blog, you will get the knowledge of APIs with the help of some conceptual and practical example.

AfterAcademy Tech
What are Proxy Servers and how do they protect computer networks?
In this blog, we will learn what is a proxy server, how does it work and what are the various types of proxy servers. We will also see why we should use a proxy server and what are the risks associated with it.
AfterAcademy Tech
TypeScript Tutorial For Beginners
In this tutorial, We are going to learn about the basics of Typescript. If you are having any doubts, whether to use typescript over javascript or Do I really need it? then this article is for you. Learn the concepts behind Typescript and its necessity in today's world.