RESTful API Using Node and Express
AfterAcademy Tech
•
06 Mar 2020
In this tutorial, we will learn to build the RESTful API using Node and Express. The goal is to make you comfortable in building your RESTful API with Node.js and Express. At the end of this blog, you will be able to build your REST APIs using Node.js and Express.
We will be covering the following topics:
- Prerequisite
- Getting Started
- Project Structure
- Installation and other setups
- Defining package.json
- Mongo Installation
- Setting up Mongoose via NPM
- Setting up Express
- Testing Our API Using Postman
- Creating POST Todos ROUTE - /todos
- Creating GET Todos ROUTE - /todos or /todos/:id
- Creating DELETE todos ROUTE - /todos/:id
- Creating UPDATE todos ROUTE - /todos/:id
Prerequisite
The prerequisite for this tutorial:
- What exactly is API? You can learn from here.
- What exactly are REST and RESTful web services? Learn from here.
Getting Started
We will build a small project from scratch! The project that we are going to build is a Todo Application. This will not be a complete application as it will not include the frontend. We are going to show you how to implement the RESTful API part for this application. So let's get started.
Project Structure
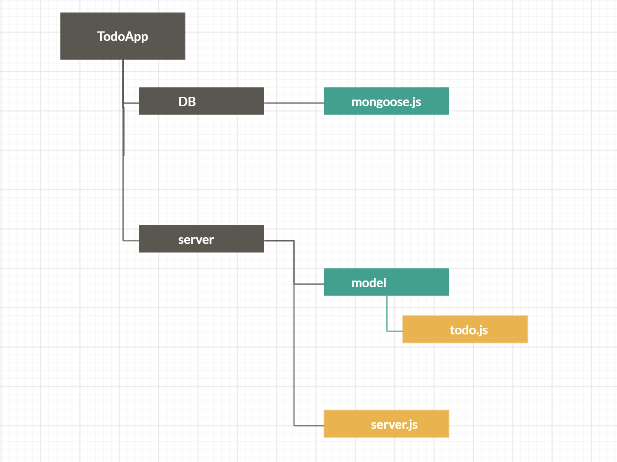
Let's look at all the files that we need to create for our Todo application. We will need to define Node packages, start our server using Express, define our model and declare our routes using Express. Our project structure looks like this:
Installation and other setups
Before we jump in, let’s make sure you’ve got Node installed. You can check this by typing the following command in the command prompt:
node -v
If there is a version coming then it means that node is already there on your machine, if not then download it from the node.js website and then check the version again. Once it is done, we can start setting up our Todo Application.
Defining package.json
Now, we need a package.json file to store our app’s configuration. To create one, use npm, which comes installed with Node:
// In command prompt or terminal
npm init
Answer a few questions (app name, git repo, etc…) and you’ll be ready to roll.
Mongo Installation
MongoDB is a NoSQL database that stands for NOT ONLY SQL, which is different from relational databases like MySQL, Postgres, and Oracle. SQL database store tables of data in rows and columns. In the NoSQL database, we store our data in the Collection of JSON like documents.
For this application, we will be using MongoDB as the database. Make sure you have MongoDB downloaded. If not, then download and install the MongoDB database. After installing, open the terminal, navigate to the bin folder which is present inside MongoDB folder which inturns usually present inside Program Files. Then, start MongoDB in the terminal using the command: mongod. Then open a second terminal window and run the command: mongo.
We are not going to interact with Mongo directly, instead, we are going to use a node.js library that will make our task much easier and in turn, going to interact with Mongo. Can you guess the name of that library?? Let's see.
Setting up Mongoose via NPM
You might have come across the term "Mongoose" while reading a blog regarding MongoDB or Node.js. Mongoose which is an ORM (Object-relational mapping) is a fantastic NPM(Node Package Manager) library. It manages relationships between data, provides schema validation, and is used to translate between objects in code and the representation of those objects in MongoDB.
If you want to learn more about what mongoose is in detail? how does it work? then we have a complete blog that will make you master in mongoose.
Before using mongoose in our application, we have to install it and because it is a node library we will install it via NPM. Over in the terminal, we will install it via npm and because we need this for both production as well as for the testing purposes, we will attach --save flag.
npm install mongoose --save
We will now move to our IDE(Visual Studio Code) and start creating files that we need in our application. At first, create an app directory with the name TodoApp (you can give any name you want). Then inside of TodoApp directory, make another directory called DB. This directory will contain files related to the database. Inside of the DB directory, make a file with name mongoose.js. It will contain all the mongoose data.
Now that the mongoose is installed on your computer. Grab it using the require() method in the mongoose.js and call connect() with the name of the database as an argument to connect with the specified database. Here, the name of the database is TodoApp_db.
// require mongoose
var mongoose = require('mongoose');

mongoose.Promise = global.Promise;
mongoose.connect('mongodb://localhost:27017/TodoApp_db');

module.exports = {mongoose};
With these 4 lines in place, the mongoose is now configured. We are now ready to define a model for the data.
Define a Model
Mongoose model is a wrapper on the Mongoose schema. A Mongoose schema defines the structure of the document, default values, validators, etc., whereas a Mongoose model provides an interface to the database for creating, querying, updating, deleting records, etc.
For defining a model, create another directory at the root level (inside TodoApp directory), with any name of your choice, we will call it server. Everything related to the server will come here. Now create a new directory inside the server directory and we will call it model. This directory will contain all the models related to our app. Inside of the model directory, we will create a file for the Todo model and we will name it as todo.js.
The next thing we are going to do is to create a Todo model. The Todo model should have a text property that denotes the task to perform, a completed property that will denote whether that particular task is completed or not, and completedAt property that will tell us when that particular task is completed.
The following code will go in todo.js.
var mongoose = require('mongoose');

// defining a Todo model
var Todo = mongoose.model('Todo', {
  text: {
    type: String,
    required: true,
    minlength: 1,
    trim: true
  },
  completed: {
    type: Boolean,
    default: false
  },
  completedAt: {
    type: Number,
    default: null
  }
});
module.exports = {Todo};
Once it's done. We are now ready to actually instantiating the Todo Model. But before that, we have to set up the Express server.
Setting up Express
Express is a minimalist and extensible web framework built for the Node.js ecosystem. It enables you to create a web server that is more readable, flexible, and maintainable than you would be able to create using only the Node HTTP library, which can get verbose and complicated for even the most basic web servers.
So to load express we need to make another file in the server directory. You can name it anything you like, we will call it server.js. This is going to be the root of our application. This will contain all of our express routes. When we want to start our node app, we will run this file. The first thing we need to do inside of server.js is to load in mongoose. And we will do this by using require(). Also, we will load both models. The following code will go in server.js.
// loading mongoose, Todo and User Model
var {mongoose} = require('./db/mongoose');
var {Todo} = require('./models/todo');
var {User} = require('./models/user');
Once we load those modules, we can now install express via npm:
npm install express --save
Also, we will be installing another module called body-parser. It is going to let us send JSON data to the server. The server can take that JSON and do something with it. body-parser essentially parses the body. It takes that string body and turns it into JS Object. So what it does is that it extracts the entire body portion of an incoming request stream and exposes it on req.body.
So, we will install it using npm.
npm install body-parser --save
Both the express and body-parser is now set up. Inside the server.js file, we can start configuring our app. We will first load the two modules. Express and body-parser and set up a basic server. Also, don't forget to write the middleware code for body-parser in the server.js file. The following code will go into the server.js file.
var express = require('express');
var bodyParser = require('body-parser');

var {mongoose} = require('./db/mongoose');
var {Todo} = require('./models/todo');
var {User} = require('./models/user');

var app = express();

// body-parser middleware
app.use(bodyParser.json());

app.listen(3000, () => {
 console.log('Started on port 3000');
});
module.exports = {app};
Testing Our API Using Postman
Finally, we will be installing Postman for testing our application. Postman is an essential and fantastic tool if you are building rest API. Postman is heavily used by the developers. Postman lets you create HTTP request and fire them off. That makes it really easy to test whether everything you are writing, works as expected. We will use Postman to add, delete or get all of our todos. Make sure that you have the Postman installed.
Creating POST Todos ROUTE - /todos
We will now create our first route and that will be the post route. This will let us create new Todos. We will do this by using the POST HTTP method.
So whenever we want to make a new Todo, we are going to send a JSON object over to the server. That object is going to have text property, the server is going to get that text property, create the new model and send the complete model back to the client.
To create and save todos, we will make a POST request to the URL [localhost:port/todos]. For that, we will first have to listen to that endpoint and we will do that by using the post() method. As the text will be given by the user or sent by the client, therefore the text should be present in the request object. For that, we have to access the request’s body, and we will do that by using body-parser. The following code will go in server.js file:
// post request for creating todos
app.post('/todos', (req, res) => {
var todo = new Todo({ text: req.body.text});
todo.save().then((doc) => {
 res.send(doc);
 }, (e) => {
 res.status(400).send(e);
 });
});
Now start the server by writing
node server.js
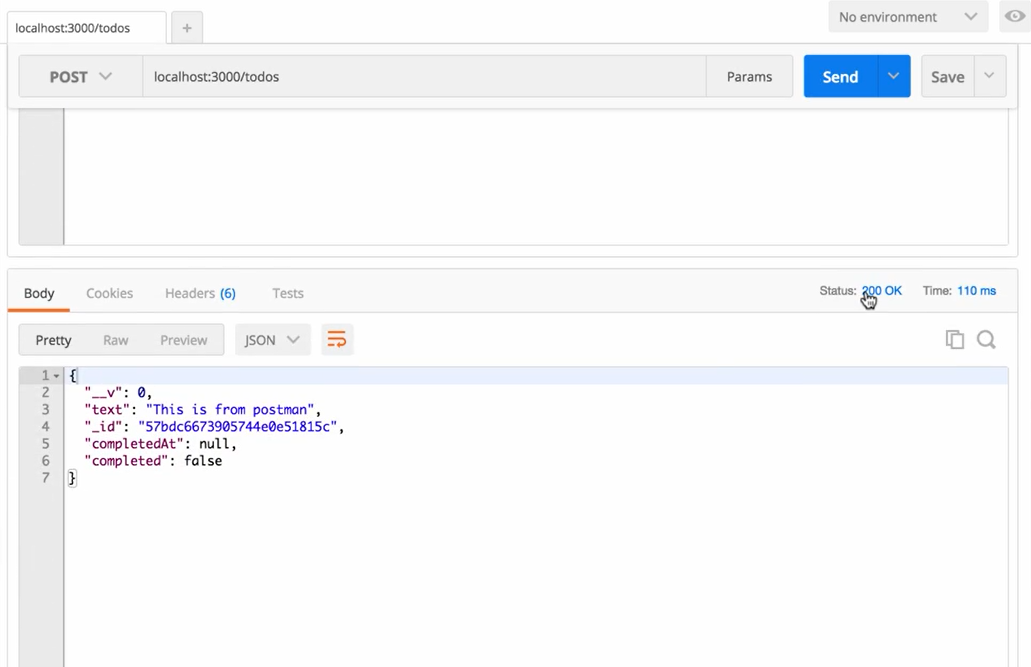
The server will start running at PORT 3000. Now go to Postman, make a POST request to the specified URL. Before that, set text property equal to any value (we have set text : "This is from postman") in the request body (in JSON format) and press SEND. You will see that the response from the server will contain status 200. It will look something like this.
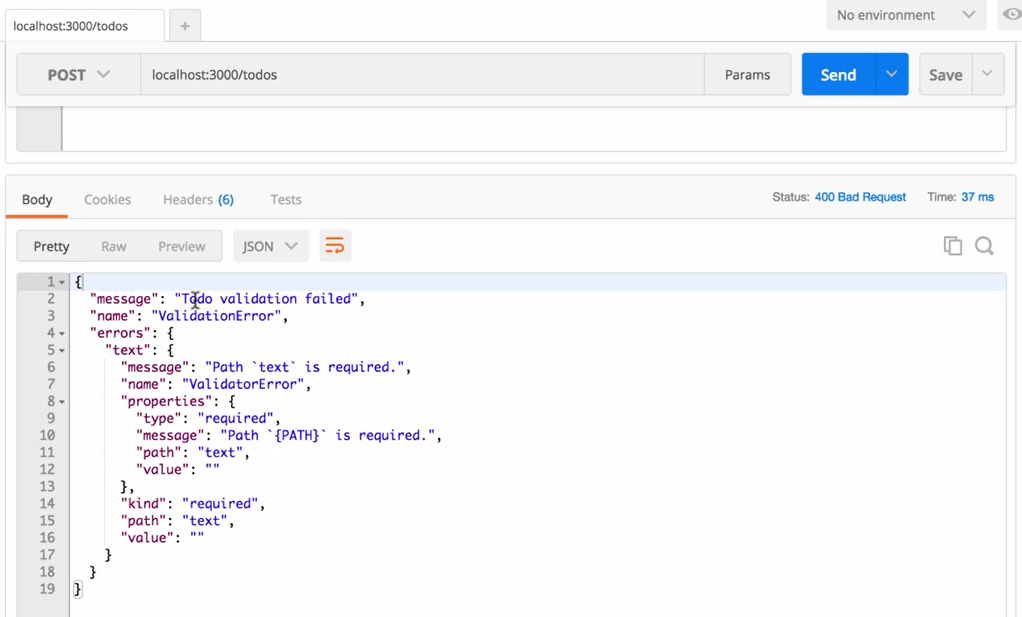
Try another request but this time, by making the text string as empty string you will get status 400. This is because of the various validation we have done when defining the model (required, trim, etc).
Our POST route is done. Now, lets set up our second route as well.
Creating GET Todos ROUTE - /todos or /todos/:id
- Get all Todos
Let’s try to retrieve all Todos which we have saved to the database earlier. To retrieve todos, we will make a GET request to the URL [localhost:port/todos]. For that, we will first have to listen to this endpoint. We will do that by using the get() method. The following code will go into the server.js file.
// Get request to get all todos
app.get('/todos', (req, res) => {
  Todo.find().then((todos) => {
    res.send({todos});
  }, (e) => {
    res.status(400).send(e);
  })
});
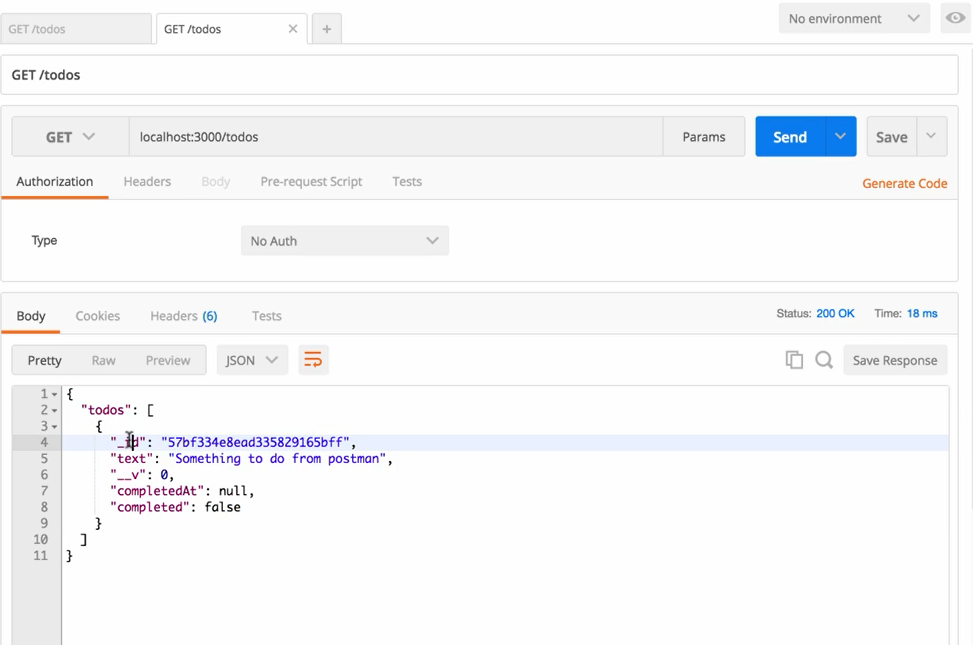
Now test it using Postman, make a GET request to the specified URL. Grab an id of already present todo, and paste in the URL bar of postman and press SEND. You will see that the response from the server will contain status 200. It will look something like this.
- Get an individual todo (by its id)
We will now create an API route for fetching individual todo. For fetching a todo with the help of some parameter that is passed in the URL. As this is also a get request so therefore we will use get() method only. To retrieve a single todo, we will make a GET request to the URL [localhost:port/todos/:id]. This will create an id variable. It's going to be on the request object. We then can access that variable. Also, we will check whether the id which is passed as a request parameter, is correct or not. For that, we will use ObjectId which is a predefined property in MongoDB.
The following code will go in server.js.
// destructuring ObjectID from mongodb
var {ObjectID} = require('mongodb');
app.get('/todos/:id', (req, res) => {
    var id = req.params.id;

    if (!ObjectID.isValid(id)) {
       return res.status(404).send();
    }

    Todo.findById(id).then((todo) => {
         if (!todo) {
             return res.status(404).send();
         }
         res.send({todo});
    }).catch((e) => {
       res.status(400).send();
    });
});
Here we have used req.params. This is an object, in the key-value pair, where the key is URL parameter like id and value is whatever value is put there on the URL.
Now test it using Postman, make a GET request to the specified URL. Grab an id of already present todo, and paste in the URL bar of postman and press SEND. You will see that the response from the server will contain status 200. It will look something like this.

You can also try to put an unavailable id in the URL. You will get a status of 404.
Creating DELETE todos ROUTE - /todos/:id
To delete a Todo, we will make a DELETE request to the URL [localhost:port/todos/:id]. For that, we will first have to listen to that endpoint and will do that by using the delete() method that takes the id of the object you want to delete from the database as an argument.
The following code will go into the server.js file.
// delete request to delete a todo based on particular id
app.delete('/todos/:id', (req, res) => {
  var id = req.params.id;
  if (!ObjectID.isValid(id)) {
    return res.status(404).send();
  }
  Todo.findByIdAndRemove(id).then((todo) => {
       if (!todo) {
          return res.status(404).send();
       }
       res.send(todo);
  }).catch((e) => {
    res.status(400).send();
  });
});
Now test it using Postman, make a DELETE request to the specified URL. Grab an id of already present todo, and paste in the URL bar of postman and press SEND. You will see that the response from the server will contain status 200. Also, you will find that the required document is removed from the database. It will look something like this.
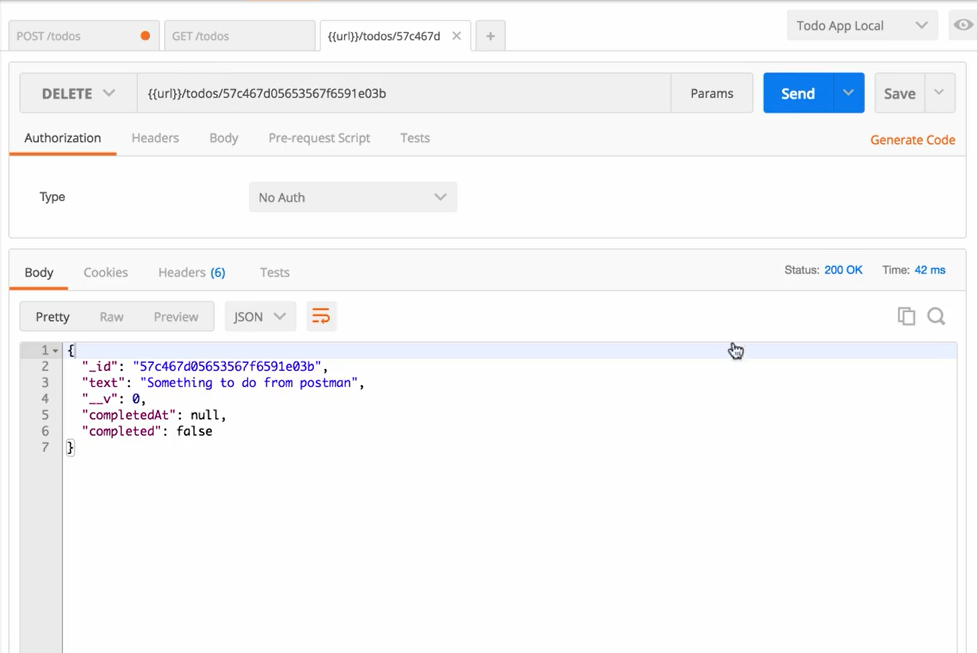
Here we have removed the todo whose text property was "Something to do from postman"
Creating UPDATE todos ROUTE - /todos/:id
This route will let you update a TODO item, whether you want to change the text to something else or you want to toggle it as completed. So let's modify the todo present in the database, by changing the completed property of an already present todo. To update a todo, we will make a PATCH/PUT request to the URL [localhost:port/todos/:id]. Here, id will be equal to the id of the todo, that you want to change. For that, we will first have to listen to that endpoint and will do that by using the patch() method.
Also, we will be installing a library called lodash. The lodash library provides some of the best utility functions. So we will be taking advantage of some of those in our update route. To install it using the following command
npm install lodash --save
Once it is installed we will require it up and then we will add the route. The following code will go into the server.js file.
// loading lodash module
const _ = require('lodash');

app.patch('/todos/:id', (req, res) => {
    var id = req.params.id;
    var body = _.pick(req.body, ['text', 'completed']);

    if (!ObjectID.isValid(id)) {
       return res.status(404).send();
    }

    if (_.isBoolean(body.completed) && body.completed) {
       body.completedAt = new Date().getTime();
    } else {
       body.completed = false;
       body.completedAt = null;
    }

   Todo.findByIdAndUpdate(id, {$set: body}, {new:true})
       .then((todo) => {
           if (!todo) {
              return res.status(404).send();
           }
           res.send({todo});
       }).catch((e) => {
              res.status(400).send();
       })
});
Here we have used MongoDB operators for e.g. $set. The $set operator replaces the value of the field with the specified value.
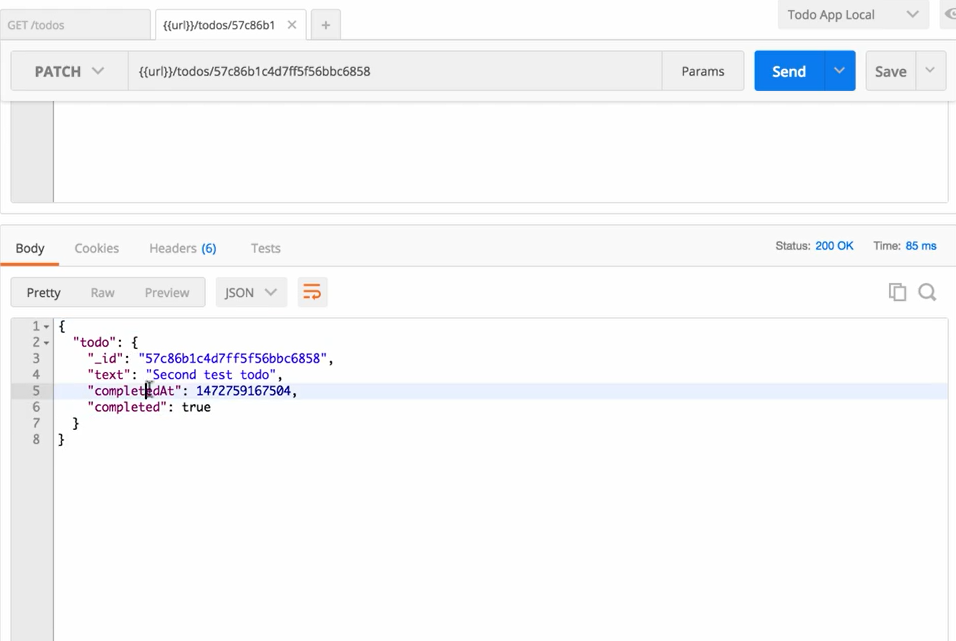
Now test it using Postman, make a PATCH request to the specified URL. Grab an id of already present todo, and paste in the URL bar of the postman. Then update the body of the request object by setting completed property to true (you can change any property you like), and press SEND. You will see that the response from the server will contain status 200.
The complete code for server.js will be
const _ = require('lodash');
const express = require('express');
const bodyParser = require('body-parser');
const {ObjectID} = require('mongodb');

var {mongoose} = require('./db/mongoose');
var {Todo} = require('./models/todo');
var {User} = require('./models/user');

var app = express();
const port = process.env.PORT || 3000;

app.use(bodyParser.json());

app.post('/todos', (req, res) => {
 var todo = new Todo({
    text: req.body.text
  });

  todo.save().then((doc) => {
    res.send(doc);
  }, (e) => {
    res.status(400).send(e);
  });
});

app.get('/todos', (req, res) => {
  Todo.find().then((todos) => {
    res.send({todos});
  }, (e) => {
    res.status(400).send(e);
  });
});

app.get('/todos/:id', (req, res) => {
 var id = req.params.id;

 if (!ObjectID.isValid(id)) {
 return res.status(404).send();
  }

  Todo.findById(id).then((todo) => {
 if (!todo) {
 return res.status(404).send();
    }

    res.send({todo});
  }).catch((e) => {
    res.status(400).send();
  });
});

app.delete('/todos/:id', (req, res) => {
 var id = req.params.id;

 if (!ObjectID.isValid(id)) {
 return res.status(404).send();
  }

  Todo.findByIdAndRemove(id).then((todo) => {
 if (!todo) {
 return res.status(404).send();
    }

    res.send({todo});
  }).catch((e) => {
    res.status(400).send();
  });
});

app.patch('/todos/:id', (req, res) => {
 var id = req.params.id;
 var body = _.pick(req.body, ['text', 'completed']);

 if (!ObjectID.isValid(id)) {
 return res.status(404).send();
  }

 if (_.isBoolean(body.completed) && body.completed) {
    body.completedAt = new Date().getTime();
  } else {
    body.completed = false;
    body.completedAt = null;
  }

  Todo.findByIdAndUpdate(id, {$set: body}, {new: true}).then((todo) => {
 if (!todo) {
 return res.status(404).send();
    }

    res.send({todo});
  }).catch((e) => {
    res.status(400).send();
  })
});

app.listen(port, () => {
 console.log(`Started up at port ${port}`);
});

module.exports = {app};
With this, we have successfully created our very first REST APIs for the Todo Application.
Closing Notes
Now, we know how to build the API using Node and Express. There are many more things you can do with your own APIs. You can add authentication, create better error messages, add different sections so you're not just working with Todos. Using the techniques mentioned in this blog, you should be able to build larger and more robust APIs.
Keep Learning 🙂
Team AfterAcademy!!
Written by AfterAcademy Tech
Share this article and spread the knowledge
Read Similar Articles
AfterAcademy Tech
File Upload with Multer in Node.js and Express
In this tutorial, we are going to learn how to upload files on the server with the help of Multer and Express in Node.js. The goal is to make you comfortable in building apps that can easily handle any file uploads. At the end of this blog, you will be able to integrate the file uploads in your own apps.

Janishar Ali
How to Architect Good Go Backend REST API Services
goserve is a robust Go backend architecture. It offers a performant and scalable framework, emphasizing feature separation, clean code, and testability. Ideal for REST API development, goserve simplifies unit and integration testing, ensuring high-quality, production-ready applications with ease.
Janishar Ali
Mastering NestJS — Building an Effective REST API Backend
Nextjs is a very popular framwork for writing API backend services using Typescript (JavaScript). Building a secure and maintainable service requires understanding software concepts, dependency injection, abstraction, and integration with popular libraries. In this article we will deep dive and develop a complete project to power an actual mobile application.
AfterAcademy Tech
Introduction to Node.js - How Node.js works?
In this article we will explore the core structures of the Node.js architecture. Node.js is a popular framework for building backend systems (network applications) which can scale very well. Node.js is a Javascript runtime based on Chrome V8 engine.