Mastering Mongoose for MongoDB and Nodejs
AfterAcademy Tech
•
25 Feb 2020

We are writing this article, to share our knowledge of Mongoose for MongoDB and Node.js. This article is for people who are curious to learn about Mongoose and MongoDB as well as people who are interested in backend development. The goal is to make you understand what exactly Mongoose is, how MongoDB and Mongoose work together with node.js. At the end of this article, we are sure that you will gain confidence in building your very own application with node.js, Mongoose and MongoDB. In this blog, we will master the Mongoose concepts by covering the following topics:
- What is Node.js?
- What are the ways to interact with the database?
- What is MongoDB?
- Building some NoSQL Vocabulary
- What is Mongoose?
- Installation and other setups
- Defining a Model
- CRUD and other Operations
- Using Mongoose with Promises
What is Node.js?
You may hear developers talk about Node or Node.js when discussing Full Stack JavaScript. But what is Node.js and should you learn it? Of course, you should learn it. And if you don’t know where to start, Just wait!! don’t panic, we have a complete blog on "Introduction to Node.js and how it works?", that beautifully explains pretty much everything you need to know about Node.js. Go through it and come back fast!
What are the ways to interact with the database?
- Using the databases native query language (e.g. SQL)
- Using an Object Data Model ("ODM") / Object Relational Model ("ORM"). An ODM/ORM represents the data as JavaScript objects, which are then mapped to the underlying database. (e.g. Mongoose is an ORM).
In this article, we will focus on the second method of interacting with the database i.e. with ORM. The benefit of using an ORM is that programmers can continue to think in terms of JavaScript objects rather than database semantics.
What is MongoDB?
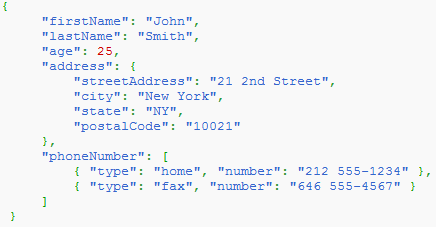
MongoDB is a NoSQL database that stands for NOT ONLY SQL, which is different from relational databases like MySQL, Postgres, and Oracle. SQL database store tables of data in rows and columns. In the NoSQL database, we store our data in the Collection of JSON like documents. For example, if you want to store personal data like first name, last name, age, address, phone number, then the corresponding JSON file will look something like this:
Now, if we want to store information like this i.e. in JSON form(key: value pair) then the NoSQL database comes into play.(Learn more about the difference between SQL and NoSQL). So, let's build some NoSQL vocabulary.
Building some NoSQL Vocabulary
You must be thinking that NoSQL databases are difficult to understand for people who have an SQL background? But take a pause! We will compare and contrast the SQL database with the NoSQL database, comparing which term maps with which term in other, to grasp better. So here we go!
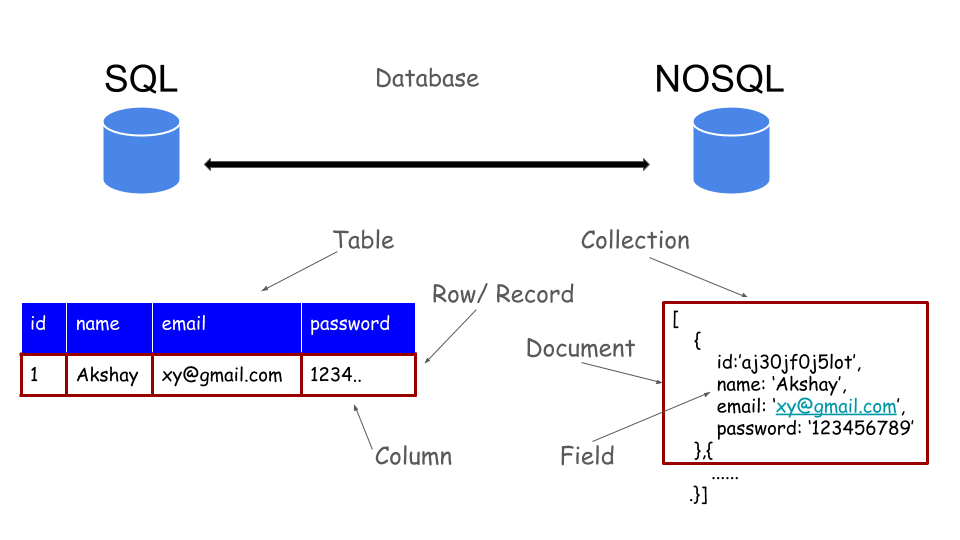
- Database - To get started, the term database is used in both. The term ‘database’ is defined as any collection of electronic records that can be processed to produce useful information.
- Collections - ‘Collections’ in Mongo are equivalent to tables in relational databases. They can hold multiple JSON documents.
- Documents - ‘Documents’ are equivalent to records or rows of data in SQL. While a SQL row can have reference to data in other tables, Mongo documents usually combine that in a document.
- Fields - ‘Fields’ or attributes are similar to columns in a SQL table.
We hope you are now confident about the various terminologies used in NoSQL databases like MongoDB. So get ready to dive deep in Mongoose.
What is Mongoose?
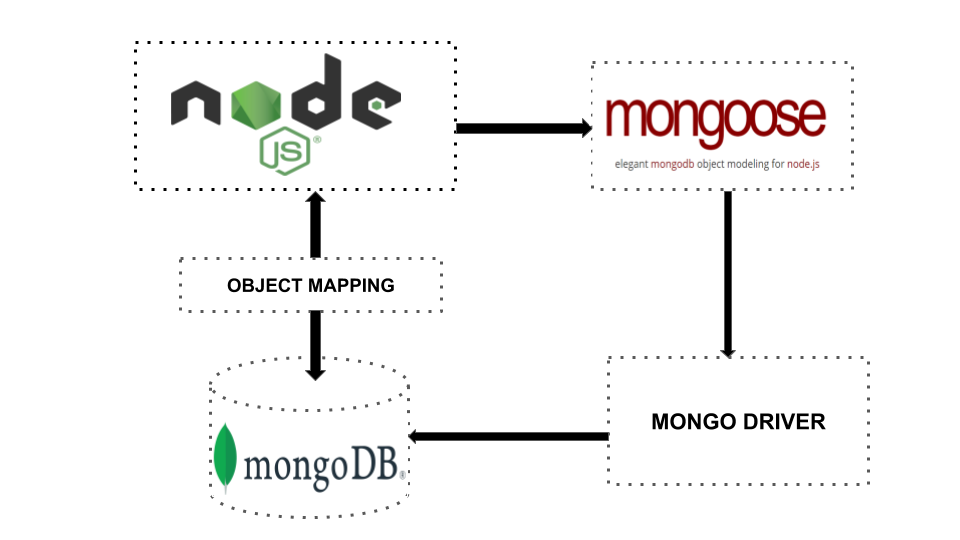
Mongoose which is an ORM (Object-relational mapping) is a fantastic NPM(Node Package Manager) library. It manages relationships between data, provides schema validation, and is used to translate between objects in code and the representation of those objects in MongoDB. It makes easy to structure your data. You can do everything that MongoDB native driver can do, with the help of Mongoose also. Instead of writing all that boilerplate code yourself, most people prefer to use Mongoose to get the job done. Mongoose provides an incredible amount of functionality around creating and working with schemas. The following diagram helps in visualizing how Mongoose works to deliver database information cyclically with our Mongo client and Node.
Getting Started
As we are focussing on gaining practical knowledge about the mongoose, therefore, we will build a small project from scratch! Here, we are going to show you, how mongoose can be used to build tiny social media application. This will not be a complete application and will not include the frontend. We are going to show you how to implement the Mongoose part. Just be with us!
Installation and other setups
Before we jump in, let’s make sure you’ve got Node installed. There are always two supported versions of Node, the Long Term Support(LTS) version (stable), and the current release. For production projects, try the LTS version. If you want to play with cutting edge features from the future, pick the current version.
Hello, World!
Node & Express are easy enough to set up a basic web-server to serve “Hello, world!” in about 10 lines of code. So just create a file and name it anything you like, we will call it app.js. The below code will go in app.js.
const express = require('express')
const app = express()
const port = process.env.PORT || 3000;

app.get('/', (req, res) => {
    res.send('Hello world!');
})

app.listen(port, () => {
    console.log(`listening on port ${port}!`);
})
Before this code will run, you’ll need to set up your app a little. You need a package.json file to store your app’s configuration. To create one, use npm, which comes installed with Node:
// In command prompt or terminal
npm init
Answer a few questions (app name, git repo, etc…) and you’ll be ready to roll. Then you’ll need to install Express:
npm install express --save
With the dependencies installed, you can run your app by typing:
node app.js
Now, Visit localhost:3000 in your browser. You will see the message.
Hello, world!
That’s it! You’ve just built your first Node app. Now download and install MongoDB as our app will contain data to be stored in the database.
Mongo Installation
To use Mongoose, we have to install most of the items seen above in the diagram(Mongoose Diagram). Mongoose is designed to work with MongoDB running in the background. So, establishing a connection is what we'll focus on first. Make sure you have MongoDB downloaded. Start MongoDB in the terminal using the command: mongod. Then open a second terminal window and run the command: mongo
Setting up Mongoose via NPM
To use Mongoose, we need to install a package called mongoose, and we will do this by typing the following command in the terminal or command prompt.
npm install mongoose --save
Now that the mongoose is installed on your computer. Grab it using the require() method in the app.js and call connect() with the name of the database as an argument to connect with the specified database. Here, the name of the database is SocialMediaApp_db.
var mongoose = require('mongoose');
mongoose.connect('mongodb://localhost/SocialMediaApp_db');
With these two lines in place, the mongoose is now configured. We are now ready to define a model for the data.
Defining a Model
A Mongoose model is a wrapper on the Mongoose schema. A Mongoose schema defines the structure of the document, default values, validators, etc., whereas a Mongoose model provides an interface to the database for creating, querying, updating, deleting records, etc. Creating a Mongoose model comprises primarily of three parts:
1. Referencing Mongoose
We have already done this by using the require() function.
2. Defining the Schema
Mongoose writes database collections in the form of schemas. Schemas function as templates or parameters for data sets, giving a collection more structure, organization, and readability before moving the information between the frontend and backend. For defining a Schema, we must first load schema property which is present in mongoose. Then we can define the attributes.
In the context of our social media app, the two schemas that we need are user schema which will store information about users i.e. their name and the post schema that will store information about user’s posts i.e. title, postedBy, and comments. Now, make a new file and name it anything you like, we will call it model.js. The model.js will contain our models and Schema. Now bring in mongoose using require() because we have to use Schema that is present in mongoose object. Here's the model.js file,
//Require Mongoose
const mongoose = require('mongoose');
//Define a Schema
const Schema = mongoose.Schema;
// Create User Schema
const UserSchema = new mongoose.Schema({
      name: String
});
// Create Post Schema
const PostSchema = new mongoose.Schema({
      title: String,
      postedBy: {
         type: mongoose.Schema.Types.ObjectId,
         ref: 'User'
      },
      comments: [{
         text: String,
         postedBy: {
           type: mongoose.Schema.Types.ObjectId,
           ref: 'User'
         }
      }]
});
// We then need to create models to use it
module.exports = mongoose.model("User", UserSchema);
module.exports = mongoose.model("Post", PostSchema);
There are a few different Schema types:
- String
- Number
- Date
- Buffer
- Boolean
- Mixed
- ObjectId
- Array
In each of these data types, you can set
- Default value for properties defined
- Some custom validation functions for validating the incoming data
- Indicate whether you want to make a field required etc.
Validator, Types, and Defaults.
We can add things like validation. We can also make certain properties required and can setup smart defaults to improve our models. Some of them include:
1. required: if you use this validation then the value of the property must exist. All you need to do is just type:
required: true
2. minlength: It is a number. It creates a validator that checks if the value length is not less than the given length.
minlength: 4
3. maxlength: It is a number. It creates a validator that checks if the value length is not greater than the given length.
maxlength: 4
4. trim: this utility removes any leading or trailing whitespace in a value.
trim: true
5. default: this utility sets a default value for the property.
default: null
After applying validation and defaults, both Schemas in model.js file will look something like this :
// Create Schema
const UserSchema = new mongoose.Schema({
      name: {
        type: String,
        required: true,
        minlength : 2,
        maxlength: 20,
        trim : true
      });
const PostSchema = new mongoose.Schema({
      title:{
        type: String,
        required: true,
        minlength : 2
        maxlength: 20,
        trim : true
      },
      postedBy: {
        type: mongoose.Schema.Types.ObjectId,
        ref: 'User'
      },
      comments: [{
        text: String,
        postedBy: {
          type: mongoose.Schema.Types.ObjectId,
          ref: 'User'
        }
      }]
});
3. Loading the Model
After defining the Schema, we are now ready for using it to create objects having those properties in it. So, first load both the models in the app.js file that we created, using require():
// Load both Models
require('./model');
const User = require('./User');
const Post = require('./Post');
This is it! You are now ready to make objects, save those objects to MongoDB database and perform CRUD operations on them.
CRUD and other Operations
CREATE
We can create an instance of the model that we defined above and save it. So we will first create 2 users in the app.js file itself and save it in the database by using the save() method. To create and save users, we will make a POST request to the URL [localhost:port/user]. For that, we will first have to listen to that endpoint and we will do that by using the post() method. As this name will be given by the user or sent by the client, therefore the name should be present in the request object. For that, we have to access the request’s body. You must be knowing that for accessing and parsing the JSON sent by the client, it is very useful to use an express module called ‘body-parser’. So what body-parser does is that it extracts the entire body portion of an incoming request stream and exposes it on req.body. So, install it using npm.
npm install body-parser
Now require it, and write the middleware code in the app.js file.
const bodyParser = require('body-parser');
// body-parser middleware
app.use(bodyParser.json());
So let's create the first user, with the name that is passed in the request object. The following code will go in app.js file:
// POST request for first user
app.post('/user', (req, res) => {
    var newUser = new User({
        name: req.body.name;
    });
    newUser.save().then(user => {
        res.send(user);
    }, (e) => {
        res.status(400).send(e);
    });
});
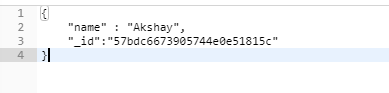
Now go to Postman, make a POST request to the specified URL with any name in the request body (in JSON format) and press SEND. You will see that the response from the server will contain status 200 and an _id property. It will look something like this.

Save the value of the _id property in some file as we will be using it in the future with GET requests. You are now done. You have just created your first user. Now with the same steps as above create another user with a different name. This user will post a comment on the first user’s post.
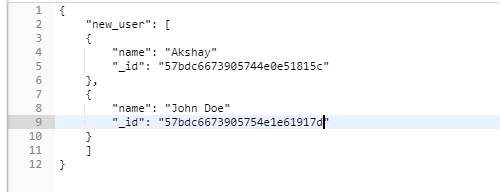
After creating the second user, now it's time for creating the post by the first user. To create and save the post, we will make a POST request to the URL [localhost:port/post]. And as this post should be posted by the first user we will pass the id of the first user in URL as well. So the complete URL will be [localhost:port/post/id/:id]. The following code will again go in the app.js file.
// POST request for post
app.post('/post/id/:id', (req, res) => {
// Create post and saving
    _id: req.params.id;
    var post = new Post({
        title: req.body.title,
        postedBy: _id,
        comments: [{
            text: req.body.comments[0].text,
            postedBy: req.body.postedByUserId
        }]
    });
    post.save().then(post => {
        res.send(post);
    }, (e) => {
        res.status(400).send(e);
    }
);
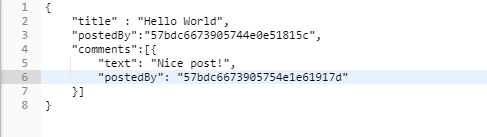
Now go to Postman, make a request to this URL by filling out various fields in the body(in JSON format), press SEND and see the response. It will look something like this.
READ
Let’s try to retrieve the Users which we have saved to the database earlier. To retrieve users, we will make a GET request to the URL [localhost:port/user]. For that, we will first have to listen to this endpoint. We will do that by using the get() method. The following code will go in the app.js file. Also, for retrieving the users, We have the following three methods.
1. find(): This method in mongoose retrieve all record from Particular collection. We can pass QUERY also to get that specific record.
app.get(‘/user’, (req, res) =>{
User.find({})
    .then(user => {
       if(!user) {
          res.status(404).send();
       }
       res.send(user);
     }).catch((e) => {
        res.status(400).send(e);
     });
});
All users will get retrieved.
2. findOne(): This method is used to get one record from schema based on condition. In this example, the condition is the id property. So we will pass the id in URL.
app.get('/user/id/:id', (req, res) => {
User.findOne({_id: req.params.id})
    .then(user => {
       if(!user) {
         res.status(404).send();
       }
       res.send(user);
    }).catch((e) => {
         res.status(400).send(e);
    });
});
Here is the response!
3. findById():- This method is used to fetch records from schema based on your mongo Id. Just type mongo Id as a query in the argument.
app.get('/user/id/:id', (req, res) => {
User.findById({_id: req.params.id})
    .then(user => {
       if(!user) {
         res.status(404).send();
       }
       res.send({user});
    }).catch((e) => {
         res.status(400).send(e);
    });
});
UPDATE RECORD
Let’s modify the record above by changing the name in a single operation. To update users, we will make a PATCH/PUT request to the URL [localhost:port/user/id/:id] with the new name in body. For that, we will first have to listen to that endpoint and will do that by using the patch() method. The following code will go in the app.js file.
app.patch('/user/id/:id', (req, res) => {
  User.findOne({_id: req.params.id})
    .then(user => {
      // new values
      user.name = req.body.name;
      user.save()
     .then(user => {
        res.send(user);
      }).catch((e) => {
           res.status(400).send(e);
      })
  });
});
Alternate approach: We can also use 2 methods for updating the record in place:
- Using findOneAndUpdate(filter, update): As the name implies, this method finds the first document that matches a given filter, applies an update and returns the document. By default, this method returns the document as it was before the update was applied.
app.patch('/user/id/:id', (req, res) => {
 // updating a record
 User.findOneAndUpdate({
   _id: req.params.id;
 },
 {
  name: req.body.name;
 });
});
2. Using findByIdAndUpdate(id, update, options, callback): This method finds a matching document, update it according to update argument, passing any options, return the found document to callback. Here we have used MongoDB operators for e.g. $set. The $set operator replaces the value of the field with the specified value.
app.patch('/user/id/:id', (req, res) => {
 // updating a record
 User.findByIdAndUpdate(
   _id: req.params.id,
   $set:{
      name: req.body.name // updating record via MongoDB operators
   },
   {
      new: true // return updated record
   }
  // callback is optional
 );
});
DELETE RECORD
To delete users or a user, we will make a DELETE request to the URL [localhost:port/user/id/:id]. For that, we will first have to listen to that endpoint and will do that by using the delete() method. Mongoose gives us 3 methods for deleting our record.
1. Using remove(): This method lets you delete multiple records. It takes a query as an argument and removes all records that match the query. But here’s the catch! You can pass an empty argument and remove() will remove all records in the document. Here, we are deleting Users that are stored in the database.
The following code will go in the app.js file.
app.delete('/user/id/:id', (req, res) => {
// deleting a record
User.remove({_id: req.params.id})
    .then(() => {
      // some code
    });
// OR
// deleting all records
User.remove({})
    .then(() => {
         // some code
    });
});
2. Using findOneAndRemove(): It will remove the very first match and also it will return the deleted record.
app.delete('/user/id/:id', (req, res) => {
// deleting a record
User.findOneAndRemove({_id: req.params.id})
    .then((user) => {
       if(!user) {
          res.status(404).send();
       }
       res.send(user);
  }).catch((e) => {
       res.status(400).send(e);
    });
});
3. Using findByIdAndRemove(): It will take Id as an argument and removes it and also it will return the deleted record.
app.delete('/user/id/:id', (req, res) => {
// deleting a record
_id: req.params.id;
User.findByIdAndRemove(_id)
    .then((user) => {
       if(!user) {
         res.status(404).send();
       }
       res.send(user);
    }).catch((e) => {
         res.status(400).send(e);
      });
});
We are now done! Now all you have to do is just type the above-mentioned URLs (for each request) in the browser and press Enter and see the console for the result. In case you are using postman, type the URL in postman and select the required request type from the dropdown and hit Enter. These are CRUD operations that you can perform on the database.
That's it, we have completed our tiny app. Of course, it will have more files that contain routes to various other endpoints, the complete front end. But that is out of scope for this blog. Maybe we will cover it some other day. For now, you can try this on our own. Build some more cool projects and wire them with mongoose.
Some other operations which can be helpful while building applications:
- Populate(): It is a Mongoose method that you can use to essentially link documents across collections. This allows you to have a schema for each of them. The population is the process of automatically replacing the specified paths in the document with the document(s) from other collection(s). We may populate a single document, multiple documents, plain objects, multiple plain objects, or all objects returned from a query. In our case, we will use populate, when we need all posts along with comments on those posts by users. If we do not use populate, then post alone will come with no comments. Here we will use the GET request method for getting all posts(along with comments) to generate a request to the URL [localhost:port/post]. .populate() needs a query to attach itself to, so we are using Post.find() to find all existing Posts. This returns our post document. Calling .exec() just executes something once .populate() has done it’s thing. The following code will go in the app.js file.
app.get('/post', (req, res) => {
   post.save(function(error) {
       if(!error) {
         Post.find({})
             .populate('postedBy')
             .populate('comments.postedBy')
             .exec(function(error, posts) {
                console.log(JSON.stringify(posts, null, "t"));
             })
       }
  });
});
As you can see, we're using the populate function of mongoose to join the documents when querying for Posts. The first call to populate joins the Users for the postedBy property of the posts whereas the second one joins the Users for the comments.
2. TEXT SEARCH: We all know how important it is to have a great search feature for any app. A lot of us end up using elastic search. Here is an alternative way.
Using $text: $text performs a text search on the content of the fields indexed with a text index. MongoDB provides text indexes to support text search queries on string content. text indexes can include any field whose value is a string or an array of string elements.
Indexing: You can add a text index to your Mongoose schema definition that lets you use the $text operator in your find queries to search all fields included in the text index. If you already know the fields which will hold the values which you may want to search, indexing the database leads us to faster search results with the drawback of a tiny overhead whenever we insert new records. To create an index to support text search on, say, User’s ‘name’
// Indexing
UserSchema.index({name: 'alex');
A $text expression has the following syntax:
// Full text search
.find({
    $text : {
              $search: <string>,
              $language: <string>,
              $caseSensitive: <boolean>,
     }
});
The $text operator accepts a text query document with the following fields:
- $search: A string of terms that MongoDB parses and uses to query the text index. MongoDB performs a logical OR search of the terms unless specified as a phrase.
- $language: Optional. The language that determines the list of stop words for the search and the rules for the stemmer and tokenizer.
- $caseSensitive: Optional. A boolean flag to enable or disable case sensitive search.
The $text operator, by default, does not return results sorted in terms of the results’ scores.
3. Error Handling: Mongoose introduces the ability to handle errors in middleware. This lets you write middleware and plugins to transform errors into something useful for your application. You define an error handler the same way you define a normal post middleware. To mark a post middleware as an error handler, you need to make it take 3 parameters:
// Handler **must** take 3 parameters: the error that occurred, the document
// in question, and the `next()` function
schema.post('save', function(error, doc, next) {
         if(error.name === 'MongoError' && error.code === 11000){
           next(new Error('There was a error'));
         } else {
            next(error);
         }
});
An error handler middleware only gets called when an error occurred. With this new feature, you can write plugins that can convert MongoDB-specific errors (like the duplicate key error above) as well as mongoose-specific errors (like validation errors) into something that makes sense for your application.
4. $match: $match is a Mongo operation that filters the documents to pass only the documents that match the specified condition(s) to the next stage. The $match stage has the following prototype form:
{ $match: { <query> } }
The following operation uses $match to perform a simple equality match:
db.articles.aggregate([ { $match : { name : "dave" } } ]);
Here articles are the database name.
5. SELECT(): It specifies which document fields to include or exclude (also known as the query "projection").When using string syntax, prefixing a path with - will flag that path as excluded. When a path does not have the - prefix, it is included. It takes an OBJECT or STRING as an argument.
// include a and b, exclude other fields
query.select('a b');
// exclude c and d, include other fields
query.select('-c -d');
Using Mongoose with Promises
Mongoose queries traditionally follow the typical node.js callback pattern. Thanks to Mongoose and ES6 Promises these can be rewritten using a much more pleasant pattern using promises. Mongoose async operations, like .save() and queries, return then(). This means that you can do things like MyModel.findOne({}).then() and await MyModel.findOne({}).exec() if you're using async/await. By default, these query methods return a Promise.
Using callbacks
someMongooseModel.find(someInput, function(err, results) {
     if(err) {
       panic(err);
       return;
     }
   /* No error. Proceed as planned. */
  doSomething(results);
});
Using Promises
someMongooseModel.find(someInput)
.catch(panic)
.then(doSomething);
Making use of the actual native Promise that ES6 provides, requires very little setup thanks to Mongoose exposing mongoose.Promise
// Set mongoose.Promise to any Promise implementation
mongoose.Promise = Promise;
Plugging in your own Promises Library
If you're an advanced user, you may want to plug in your own promise library like a bluebird. Just set mongoose.Promise your favorite ES6-style promise constructor and mongoose will use it.
Closing notes
In this blog, we have covered everything and this will act as a good reference guide for all of you.
We hope you have understood what mongoose is and how it is being used in the development environment.
Keep Learning 🙂
Team AfterAcademy!
Written by AfterAcademy Tech
Share this article and spread the knowledge
Read Similar Articles
AfterAcademy Tech
Mastering Backpropagation in Neural Network
In this blog, we are going to master the Backpropagation Algorithm used in Neural Network in Machine Learning. We will also cover the intuition behind it and it's derivation.

Janishar Ali
Design NodeJs Backend Architecture like a Pro
Node.js backend architecture in Typescript. Learn the concepts behind building a highly maintainable and performant backend server application in ExpressJs. Implement a blog platform - role based APIs using JWT. ExpressJs, Mongodb, Redis, Joi, and Jest
AfterAcademy Tech
Mastering Activation Functions in Neural Networks
In this blog, we are going to learn what is activation function and it's types. We will also learn what is a good Activation function and when to use which Activation function in Neural Network.

Janishar Ali
Mastering NestJS — Building an Effective REST API Backend
Nextjs is a very popular framwork for writing API backend services using Typescript (JavaScript). Building a secure and maintainable service requires understanding software concepts, dependency injection, abstraction, and integration with popular libraries. In this article we will deep dive and develop a complete project to power an actual mobile application.