Learn Debugging Node.js Applications
AfterAcademy Tech
•
13 Aug 2020

Debugging: Being the detective of a crime where you are also the criminal.
Your application is not performing the way it's supposed to and you don’t know why. If you’re lucky, its a syntax error, and the error is pointed out in the terminal along with its line number. But if you’re unlucky, which in most cases you will be, you won’t know where the problem is coming from and you’ll need to debug the source code. Hence, the problem begins!
Most programming languages have their own debuggers supported by IDEs but Javascript is a scripting language, therefore, it doesn’t have an inbuilt full-featured debugger. Also, most developers prefer lightweight code editors for JS rather than bulky IDEs which might have less support for extra tools like debuggers. Let’s not get ahead of ourselves though. Fortunately, there are still plenty of ways to debug your JS code. Let’s go through them one by one.
Tip: Code Faults such as Syntax errors, bad indentation, undeclared variables can be caught before code testing by using eslint module(npm package).1. The evergreen console.log(‘Reached here!’)
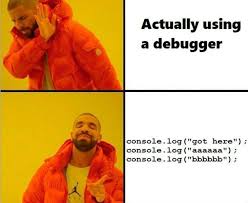
Unfortunately, one of the most used ways to finding why and where your application is crashing is scattering console.log() statements throughout your code to narrow down the position towards the faulty code. This is one of the most ineffective, lazy, and tedious method of debugging, not only in JS but in any language. Highly common among beginner developers, this style is very messy and not advisable at all, yet many do it.
2. Using inspect command
Node.js provides an inbuilt out-of-process debugging utility that is accessible via a V8 inspector. Basically, you can insert ‘debugger;’ in your script and it will act as a breakpoint.
The Node.js debugger client is not a full-featured debugger, but simple step and inspection are possible.
But first, when you start the application, you need to use the inspect command →
$ node inspect index.js
< Debugger listening on ws://127.0.0.1:9229/80e7a814-7cd3-49fb-921a-2e02228cd5ba
< For help, see: https://nodejs.org/en/docs/inspector
< Debugger attached.
This will allow you to use the step-by-step inspection process while the script executes. As the breakpoints are reached, the terminal will provide you a debug CLI
debug>
Here you can use commands such as cont(continue), next, step, pause, etc. You can read more about how to use the Node.js debugger here.
★ Alternatively, you can debug the application directly in Chrome because it has an inbuilt V8 inspector too.
You do not need to insert ‘debugger;’ in the source code when debugging in ChromeAll you need to do is use ‘inspect’ as a flag
$ node --inspect index.js
The debugger will now again be active at 9229 port.
☛ Open Chrome and go to chrome://inspect.
☛ In the list of Remote Targets, you will find your file index.js.
☛ Click on the inspect link next to the file and you will be taken to Dev Tools.
☛ Clicking on any point now will let you set that line as a breakpoint.

Source: Chrome Dev Tools documentation
☛ There are several features in Chrome Dev Tools for debugging such as →
- Breakpoints pane: Shows a list of all breakpoints
- Watch pane: Let’s you monitor the values of selected variables throughout breakpoints
- Call Stack pane: Shows the list of functions being called to reach the current point in code
Want to know more about Chrome Dev Tools for Javascript Debugging? Go here.
Fun Fact: The functionality of Call Stack can be duplicated using console.trace()
Yes! console has functions other than console.log() 😇.
3. Using the VSCode code editor
VSCode has inbuilt debugging support for Javascript and Typescript.
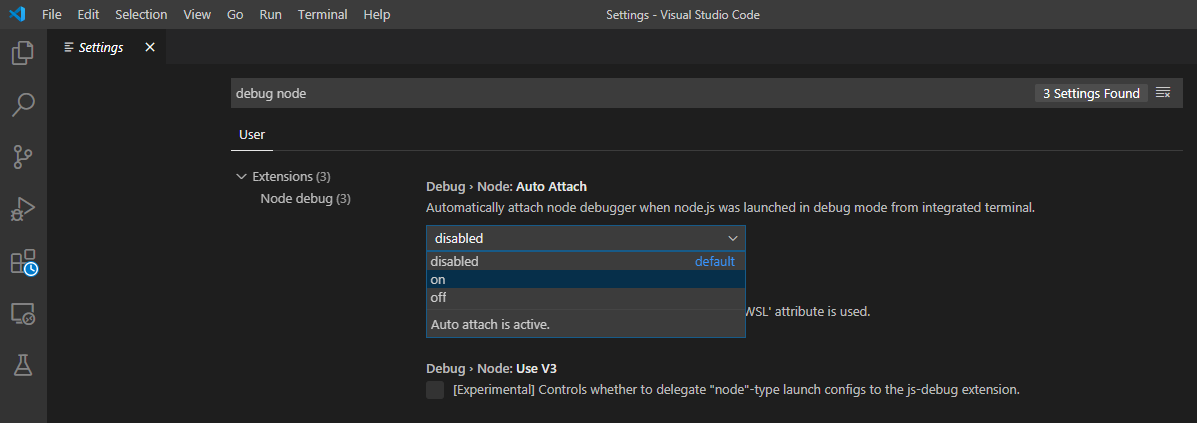
Setting up VSCode Node.js Debugger
- Go to Preferences>Settings
- Search “debug node”.
- Set the Auto Attach as on.
- Done!
Using the VSCode Debugger
Now just like in Chrome Dev Tools, you can select line numbers and set breakpoints. Just use the inspect flag in the terminal and the VSCode debugger will start working.
$ node --inspect index.js
Debugger listening on ws://127.0.0.1:9229/0f9c699c-e6e5-4db8-b311-cb447bac0381
As soon as the command is run, you will see the debugger in action. Your terminal console will then show
Debugger attachedBy default, the debug console will be active now.
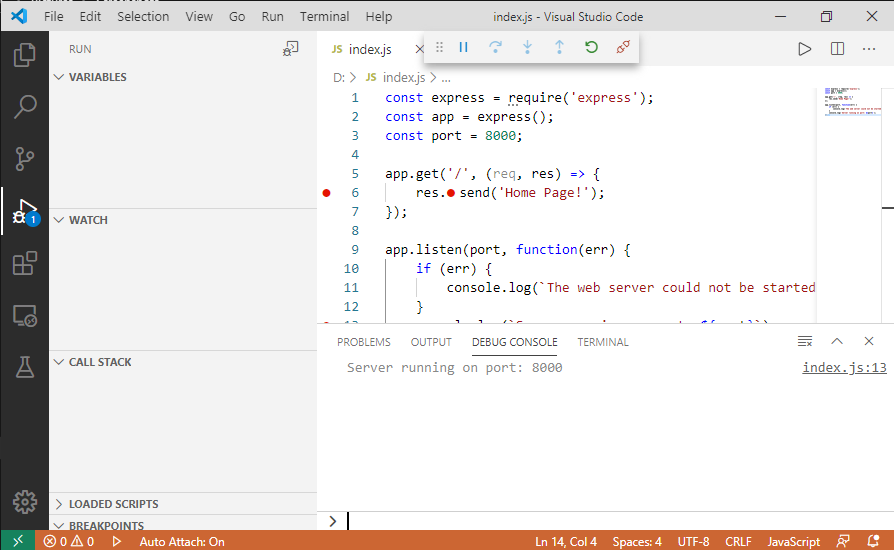
As you can see,
- The status bar will change to orange color, which means VSCode has now entered into debugging mode.
- The Run side-bar will now be active.
- A debugger control panel will be on top of the window.
The sections in the sidebar are similar to features in Chrome Dev Tools as explained above → Watch, Call Stack, Breakpoints, etc.
We can see a demo of using the debugger and adjusting values on the run here →

Source: VSCode Node.js Debugger documentation
All the debugging functionalities can be accessed via the debugger panel and sidebar.
There’s a detailed explanation of debugging Node.js in VSCode in their documentation website with demo gifs here.
Another Important Tip: Load testing
Load testing is not technically a part of debugging. Nevertheless, it is quite important to load-test your application before releasing it. Some good open-source tools for load-testing your applications are httperf, JMeter, Gatling, etc.
Conclusion
Do not debug using console.log() statements.
Please provide your feedback in the comments below.
Happy Learning!
Written by AfterAcademy Tech
Share this article and spread the knowledge
Read Similar Articles
AfterAcademy Tech
Introduction to Node.js - How Node.js works?
In this article we will explore the core structures of the Node.js architecture. Node.js is a popular framework for building backend systems (network applications) which can scale very well. Node.js is a Javascript runtime based on Chrome V8 engine.
AfterAcademy Tech
File Upload with Multer in Node.js and Express
In this tutorial, we are going to learn how to upload files on the server with the help of Multer and Express in Node.js. The goal is to make you comfortable in building apps that can easily handle any file uploads. At the end of this blog, you will be able to integrate the file uploads in your own apps.
AfterAcademy Tech
Event Loop in Node.js - Concurrency Model
Node.js uses the event-loop and callback mechanism to lift off I/O operations from the javascript's thread to the system's kernel. And in this article we are going to understand how this actually happens.

AfterAcademy Tech
Chrome V8 Engine - Javascript runtime for Node.js
Chrome V8 engine originally run in Chrome web browsers. But later it was used to run the javascript without a browser. Node.js is written in C++ and build on top of Chrome V8 engine, which provides the runtime for the Javascript.