From JavaScript to TypeScript
AfterAcademy Tech
•
15 May 2020
With one of the biggest communities out there JavaScript is the most popular language which is easy to learn and use both at the client-side and server-side. Even with this popularity, JavaScript has some pitfalls. One of them is its loosely-typed behaviour. These pitfalls result in the development of TypeScript which is considered to be the superset of JavaScript. One of the features of TypeScript is to add types to JavaScript. Types? What are these?
So, welcome to AfterAcademy, in this tutorial, we are going to learn about some of the features that TypeScript provides which may or may not be present in JavaScript and are important to know if you are migrating from JavaScript to TypeScript.
If you do not know the basics of TypeScript, then we have a complete blog on "TypeScript for Beginners".
So let’s begin,
Compiler Configuration
Its really important to understand what compiler configuration means, why it is used in TypeScript and how to use it. Especially if you are migrating from JavaScript to TypeScript. All compiler configurations are written in the tsconfig.json file. So, generate it using the following command:
tsc --init
Open the file, and you will see a lot of options are commented by default. So, let's look at some of those options.
1) files: We can specify the files that need to be compiled. By default, the compiler will compile all the .ts files that are present in the root directory. If we want the compiler to compile only some of them, then we can specify with this option.
If the .ts is excluded, it automatically searches for .ts and .tsx file.
{
   "compilerOptions": { },
   "files": [
       "app.ts",
       "index"
    ]
}
2) target: With the help of ‘target’ we can tell TypeScript to compile to which particular version of JavaScript. For example, if you want to choose ES5, then:
{
   "compilerOptions": {
       "target": "es5"
   }
}
3) lib: TypeScript includes some built-in JavaScript APIs and libraries that match the target we have specified. For example, if the target is ES5 and you are using Promises then TypeScript will issue an error:
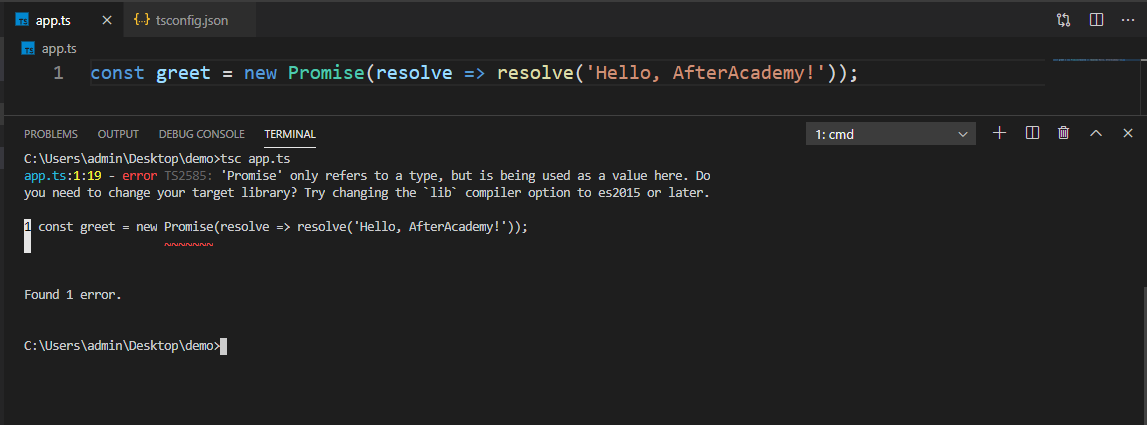
Promises are not the part of ES5, so we need to include some later version than ES5 in lib.
{
   "compilerOptions": {
       "target": "ES5",
       "lib": ["es6"]
   }
}
4) allowJs: When this is set to true, then apart from TypeScript files, the compiler will also compile JavaScript files.
{
   "compilerOptions": {
       "target": "ES5",
       "lib": ["es6"],
       "allowJs": true
   }
}
5) checkJs: allowJs will not check for type errors in JavaScript files. If you want to raise errors in JavaScript also, then enable this option by setting it true:
{
   "compilerOptions": {
       "target": "ES5",
       "lib": ["es6"],
       "allowJs": true,
       "checkJs": true
   }
}
6) outDir: By default, TypeScript generates the JavaScript files in the same directory where TypeScript file is present. You can specify the directory where all the output files should be generated in this option.
{
   "compilerOptions": {
       "target": "ES5",
       "lib": ["es6"],
       "allowJs": true,
       "checkJs": true,
       "outDir": "./dist"
    }
}
7) strict: When this property is set to true, then it enables all the following strict type-checking options automatically:
- noImplicitAny: If this is enabled, Typescript will report any error whenever it has inferred any.
- strictNullChecks: If this is enabled, TypeScript will throw an error, whenever it finds any null value.
- strictFunctionTypes: With this, TypeScript strictly check the function's parameters.
- strictPropertyInitialization: When this option is enabled, TypeScript will throw an error if any class property remains uninitialized.
- alwaysStrict: TypeScript will always parse in strict mode and emit "use strict" for each source file.
We can also set individual properties to true, and strict to false as per our requirement.
TypeScript Objects
With the help of objects, we work with real-world entities in our code. Objects resemble real-life objects. Objects are instances of classes. The concept of objects is not new and is present in JavaScript as function objects, but it is really difficult to work with function-objects as we have to write a lot of redundant code. Because of this reason, classes were introduced in ES6. The TypeScript classes not only contain types but also support 3 access modifiers like private, public and protected which are available in other object-oriented languages as well.
TypeScript Classes
TypeScript classes are very similar to classes in other object-oriented programming languages. That is, a class is considered to be the blueprint of objects. They tell us how objects are going to look like. A class can be defined with the keyword class followed by class name. A class definition can contain constructors, fields, and functions.
Below is the syntax of creating a class:
// good practice to capitalize the first letter and then use camel-case
class ClassName {
   //class scope
}
Classes also contain a very special method that is invoked as soon as the object gets created and that method is called the constructor. Both in TypeScript and JavaScript, we define a constructor with the keyword constructor.
The syntax for writing constructor is:
class Person {
   property1: type;
   property2: type;
   constructor(arg1: type, arg2: type, ...) {
      // initialization of properties
   }
}
To create an object of a class, a new keyword is used, which calls the constructor and returns an object just like in any other object-oriented language.
Let's take an example by creating a Department class :
// 'Department' class declaration
class Department {
   name: string;   // field name
   constructor(n: string) {    // constructor function
      // referencing current object with 'this' keyword
      this.name = n;
   }
}

// creating object with 'new' keyword
const department = new Department('Computer Science');

console.log(department);  // logging the object
Classes, when compiles to JavaScript, produce code that depends on the version we are compiling into. If we compile in "ES6" in the tsconfig.json file, then the code will contain the class keyword.
Since we are compiling in "ES5", it will contain the constructor function.
Equivalent code in ES5 :
// 'Department' class declaration
var Department = /** @class */ (function () {
   function Department(n) {
      // referencing current object with 'this' keyword
      this.name = n;
   }
   return Department;
}());

// creating object with 'new' keyword
var department = new Department('Computer Science');

console.log(department); // logging the object
Methods
TypeScript classes can also contain methods apart from constructor functions. So let's define a method inside the Department class.
class Department {
   // same code
   departmentName() {
      console.log(`Name of department is: ${this.name}`);
   }
}
We can call this method using the object name and dot operator.
department.departmentName();
Like any other object-oriented language, we can define the scope of a variable inside classes as public or private. Remember that JavaScript does not contain these keywords, so there is no way we can distinguish between the public and private fields once it is converted to JavaScript. Let's learn more about these access controls.
Access Control
Access modifiers control the accessibility of the members of a class. TypeScript supports three access modifiers at the class level and they are - public, private, and protected.
- Public: The properties and methods of TypeScript class are public by default, so it’s not mandatory to prefix these members with a public keyword. We can access public members from anywhere in our code.
class Department {
   public name: string;
}

let department = new Department();

department.name = “Computer Science”;
- Private: A private member can only be accessed within the class and cannot be accessed outside of its class.
class Department {
   private name: string;
   membersCount: number;
}

let department = new Department();

department.name = “Computer Science”; // Compilation Error
department.membersCount = 40;  //Ok because it is public
- Protected: A protected member can only be accessed from within the class as well as from subclasses. (Inheritance)
class Parent {
   private privateProp: string;
   protected protectedProp: string;
}

class Child extends Parent {
   notAllowed() {
      return this.privateProp; // Compilation Error
   }
   thisIsAllowed() {
      return this.protectedProp;
   }
}

var obj = new Child();
obj.protectedProp = ‘some string’; // Compilation Error
Other Modifiers
Typescript also supports two other modifiers. They are static and readonly.
1) Static: If we want to access the property of a class without instantiating(calling the object with a new keyword), then we can do this by using a static keyword. Properties that are static can only be called with the help of class name, so first, mark it by prefixing the property of class with a static keyword.
For example :
class StaticMember {
   static n: number;
   static staticMethod(): void {
      console.log("The value of n is"+ StaticMember.n);
   }
}
And then we can access the property in this manner:
// initialize the static variable
StaticMember.n = 50

// calling the static method
StaticMember.staticMethod();
The reason we can call the property without instantiating is that static members are present at the class level rather than the object level. These members do not belong to any particular object. This feature is also available in JavaScript.
2) Readonly: TypeScript introduces a new keyword called readonly which was not present in vanilla JavaScript. As the name suggests readonly property is used to make a property as read-only. This modifier is used for class-level variables. Once a value is assigned to a readonly variable then we cannot reassign another value.
For example -
class Student {
   readonly rollNumber: number;
   studentName: string;
   constructor(rollNumber: number, studentName: string) {
      this.rollNumber = rollNumber;
      this.studentName = studentName;
   }
}

let student = new Student(10, "John Doe");

student.rollNumber = 30;    // Compilation Error
student.studentName = "Tim";
readonly works similar to const the only difference is that variable uses const while properties use readonly.
TypeScript Accessors
In TypeScript, some methods are used to access the values of properties present in the class known as getters and some methods are used to set the values of the properties, known as setters. These features are also available in vanilla JavaScript.
1) Getter: This method helps in accessing the value of a property. We can define a getter method with get keyword.
Syntax of the getter method -
get methodName() {
      // the code executed on getting a particular property
}
Example:
class Person {
    name: string;
    get methodName(): string {
       return this.name;
    }
    // code
}
2) Setter: This method sets the property with a particular value. We can define a setter method with a set keyword.
Syntax of the setter method:
set methodName(value) {
   // the code executed on setting
   //property = value,
}
Example:
class Person {
    name: string;
    set methodName(name: string) {
       this.name = name;
    }
    // code
}
With this, we have understood what a class is, what it contains. Now let's understand how we can handle multiple classes to set up a relationship between them i.e. let's learn about inheritance.
Inheritance
TypeScript allows you to inherit a class from existing classes. By doing that you can extend their functionality as per your requirement. This feature is available in all object-oriented languages including modern JavaScript. In TypeScript, this is done with the help of extends keyword.
Let us look at an example in which we have a class named Person and another class called Student, created by extending the Person class.
// declaring a Person class
class Person {
   firstName: string;
   lastName: string;
   constructor(firstName: string, lastName: string) {
      this.firstName = firstName;
      this.lastName = lastName;
   }
}

// declaring Student class that inherits Person class
class Student extends Person {
   department: string;
   rollNumber: number;
   constructor(firstName: string, lastName: string, department:
      string, rollNumber: number) {
      // call to Person's constructor
      super(firstName, lastName);
      this.department = department;
      this.rollNumber = rollNumber;
   }
}

// creating Student object, it will contain properties of both classes
var obj = new Student("John", "Doe", "CSE", 10);
By using inheritance, we need not write the same code again and again. In the above example, the firstName and lastName is a common property which every Person have. So, we are just extending this to our Student class and using this.
Note: Accessing properties depends on the access modifiers.
Abstract classes
If you are a developer, you must be aware of the concept of abstract classes. TypeScript allows us to define abstract classes. An abstract class is a class that contains one or more than one abstract method or property. An abstract method is a method declared inside a class prefixed with an abstract keyword and without any implementation.
For example -
abstract class Person {
   name: string;
   constructor(n: string) {
      this.name = n;
   }
   log(): void {
      console.log(this.name);
   }
   abstract search(string): Person;
}
Here, the search() method is an abstract method and therefore does not have a body and because a method in the class Person is abstract, therefore, the class name is also prefixed with an abstract keyword. It’s not possible to create an object of an abstract class. So they are always used in inheritance. The derived class must contain a proper implementation of all the abstract methods present in the base class otherwise TypeScript will throw an error.
class Student extends Person {
   rollNumber: number;
   constructor(name: string, rollNumber: number) {
      super(name); // must call super()
      this.rollNumber = rollNumber;
   }
   search(name: string): Person {
      return new Student(name, 1);
   }
}

let student: Person = new Student("John Doe", 50);
student.log();  // John Doe
let student2: Person = student.search("Tim");
The abstract class can also include an abstract property.
abstract class Person {
   abstract name: string;
   log(): void {
      console.log(this.name);
   }
}
The derived class must implement all the abstract properties as well. By implement, we mean that derived class must contain properties with the same name and type as present in the abstract class.
class Student extends Person {
   name: string;
   rollNumber: number;
   constructor(name: string, rollNumber: number) {
      super(); // must call super()
      this.rollNumber = rollNumber;
      this.name = name;
   }
}

let student: Person = new Student("John Doe", 100);
student.log(); //James
An abstract class can be used when you encounter these situations:
1. When there are several closely related classes that share the same code.
2. When you do not want to allow instantiation of a class, but only wants to provide implementation details of children.
TypeScript Interfaces
Interfaces describe the structure of an object. It means what all properties and methods, an object is going to contain. An object that has a type equal to an interface must contain the properties and methods that are defined in the interface. Unlike other programming languages, TypeScript does not require an object to have the exact same structure as defined by the interface rather objects can have any shape but they must define the functions and properties that are present inside the interface that they implement.
Also, an interface exists to perform type checking during compile time. So TypeScript compiler with the help of interface checks if variables have the structure defined by an interface.
We create an interface in TypeScript with the help of interface keyword which does not exist in vanilla JavaScript.
Let's look at an example:
interface Person {
    name: string;
    age: number;
}
Here, the Person is defined with the name and age property. Unlike classes, we cannot initialize these properties in an interface. We can add methods inside the interface but only method structure is allowed, not a concrete definition.
interface Person {
    name: string;
    age: number;
    // method that takes a string and return type is void
    greet(message: string): void;
}
Now let's use it to Typecheck an object. Let's create a variable person and store the Person structure in it.
let person: Person;
Let's assign a value to the person. The value must be an object which contains the name, the age property, and a greet() method that takes a message argument and returns nothing. In other words, the definition of the object (person) must be the same as that of the interface (Person)
person = {
   name: 'John Doe',
   age: 30,
   greet(message: string) {   // implementation of greet()
      console.log(message + ' ' + this.name);
   }
};
So, this will be a valid user as it satisfies the definition of our interface.
In short, interfaces are used to ensure that proper values are supplied to the functions, objects, properties, etc.
Implementing the Interface
We can provide an implementation of the interface in a class by implements keyword. The class implementing the interface needs to strictly follow the structure of the interface.
interface Shape {
    draw(): void;
}

class Square implements Shape {
   side: number;
   constructor(side: number) {
      this.side = side;
   }
   draw(): void {
      console.log("Drawing Square..");
   }
}
Here, it is mandatory to provide a definition to draw(), otherwise, the compiler will give an error.
Extending the interface
Just like inheritance can be performed between two or more classes, similarly, inheritance can be performed between two or more interfaces as well. Interfaces can also extend one or more interfaces. This makes writing interfaces flexible and reusable.
interface Person {
    readonly name: string;
}

interface Greeting extends Person {
    greet(message: string): void;
}

class PersonImpl implements Greeting {
   name: string;
   age = 30;
   constructor(n: string) {
      this.name = n;
   }
   greet(message: string) {
      console.log(message + ' ' + this.name);
   }
}
Readonly Interface Property
Just as a class can have readonly properties similarly interface can also have readonly properties.
interface Person {
    name: string;
    readonly age: number;
}

let person: Person = {name: "John Doe", age: 35};
console.log(person);
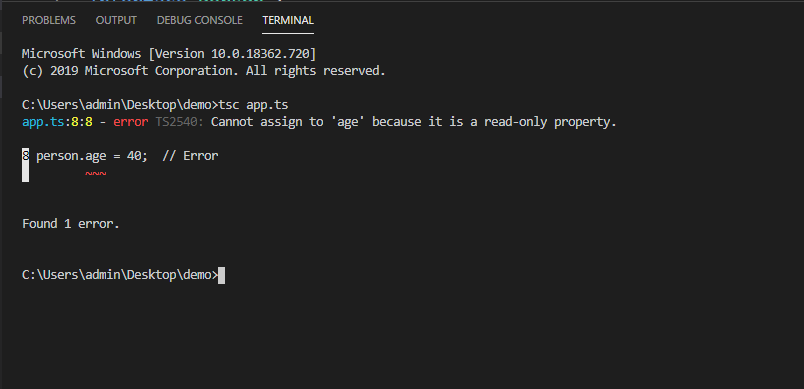
If we try to change the value of readonly property, then the compiler will give an error.
person.age = 40; // Error
Interface as function types
Interfaces are used to define the structure of an object. Now interfaces can also be used to define the structure of a function. So basically they are used as a replacement for function types. A function type is a type that describes a function regarding the parameters and the return value of that function.
The syntax for declaring interface as a function:
interface interfaceName {
    (arg1: type, arg2: type): type;
}
Let’s take a function type and convert it into the interface function type.
Let’s say, we have a function that takes two numbers as arguments and returns the sum of these numbers. The function type for this function will be:
type addFunction = (a: number, b: number) => number;
And the corresponding interface as function type will be:
interface addFunction {
    (a: number, b: number): number;
}
Now we can use it as a function type.
let add: addFunction;

add = (n1: number, n2: number) => {
   return n1 + n2;
};
So in the end, an interface as a function type acts as a custom function type.
Compiling Interfaces to JavaScript
Let's now look under the hood and see what JavaScript actually produces as an alternative to an interface as these are not present there.
Let’s define an interface first and a class that implements it in a file app.ts.
interface Person {
    name: string,
    age: number
}

class PersonImpl implements Person {
   name: string;
   age: number;
   constructor(n: string, a: number) {
      this.name = n;
      this.age = a;
   }
   // some methods
}
Now, let’s compile this file with the following command:
tsc app.ts
Look at the generated app.js file. You will not see any conversion for our interface “Person”. You will just find methods there, constructor function for Person object, and properties of the class.
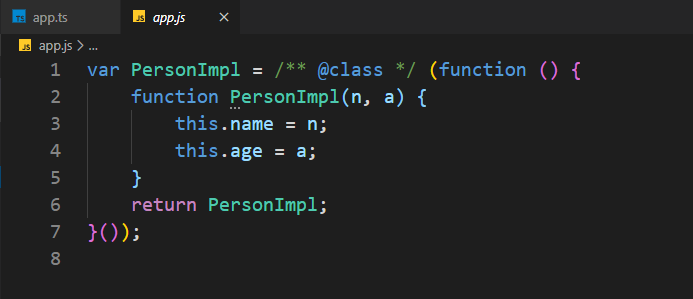
This happens because JavaScript does not know about this feature. It is a pure TypeScript feature, only available during development helping the developers to write better and clearly structured code.
Optional Parameters and properties
We can define optional parameters and properties in interfaces and classes. Optional properties in case of interfaces mean that you don't want to force every class that implements the interface to have that property. It should be optional whether you want to have that or not. We can specify an optional property with a question mark, “?”, after the property. For example:
interface Person {
    name: string;
    age?: number;  // optional property
}
This tells the compiler that age property might exist in class that implements this interface but it is not mandatory. Therefore we can even implement Person interface in this way:
class Student implements Person {
   name: string;
}
Similarly, we can have optional properties in classes as well. Moreover, we can mark even methods as optional. In this case, it is not mandatory to give implementation to such methods.
interface Person {
    // code
    myMethod?() {...}
}

class Student implements Person {
   // without implementation to myMethod()
   // code
}
Apart from optional properties, optional parameters are also allowed in both functions and methods.
constructor(n?: string) {
   // some code
}
Here “n” is optional and it will have a default value of undefined. Now, we can call this constructor without value as well.
interface Person {
    name?: string;
}

class Student implements Person {
   name?: string;
   constructor(n?: string) {
         // some code
      if(n)
         this.name = n;
      }
}

let person = new Student();  // valid syntax
console.log(`${person.name}`);
Advance Types
1) Union Type: Typescript allows us to combine two or more types. These are called union types. Two or more types are combined with the help of pipe symbol "|".
// Variable with union type declaration
let numOrStr : string | number;

numOrStr = 100;            // OK
numOrStr = 'After Academy';       //OK
Here, numOrStr can hold both number and string values.
2) Intersection types: These types allow us to combine other types. The intersection of two types is done with the help of ‘&’ operator
For example:
type Admin = {
   name: string;
   privileges: string[];
};

type User = {
   name: string;
   startDate: Date;
};

type AdminUser = Admin & User;

const e1: AdminUser = {
   name: 'John Doe',
   privileges: ['read-and-write'],
   startDate: new Date();
};
We could have achieved the same with the interface as well. We could have made two interfaces and the third interface could inherit the properties of those two interfaces as shown below:
interface Admin {
    name: string;
    privileges: string[];
};

interface User {
    name: string;
    startDate: Date;
};

interface AdminUser extends User, Admin {
    // code
};
Typescript also allows us to have intersection types of two or more union types.
For example:
type numberAndString = string | number;
type numberAndBoolean = number | boolean;

type num = numberAndString & numberAndBoolean;
In this code, num will have a type that is an intersection of the two union types i.e. number. In short, intersection operators can be used with any type. In the case of a union type, the result will be a type that is common in all the types, and in case of object types, the result will simply be the combination of the properties of every object.
3) Type assertions: Type assertions help the programmer to tell the compiler that a particular value is of some specific type. Type assertion is commonly used when we migrate the code from JavaScript to TypeScript. Type assertion is often called type casting in other programming languages. In typescript, it has only a compile-time impact and is not checked at runtime at all.
In TypeScript, we have two ways to do Type Assertion.
- Using Angular Bracket <>
let a: any = 111;
let b = <number> a;

console.log(typeof(b)); //Output: number
- Using ‘as’ keyword
let a: any = 111;
let b = a as number;
Function Overloads
It is a feature that allows us to define multiple function signatures of a function. This helps us in calling a function in multiple ways with different parameters. Function overloading exists at class level in other programming languages, but in typescript, we can overload even non-member functions as well.
type numOrStr = string | number;

function add(a: numOrStr, b: numOrStr) {
   if (typeof a === 'string' || typeof b === 'string') {
      return a.toString() + b.toString();
   }
   return a + b;
}
If we closely look at the return type of this function then we realize it will be numOrStr. Technically there is no problem but logically, there exists a problem. The return type of this function will be numOrStr and not a number even when we pass two numbers as arguments. Similarly, if we pass two strings as arguments the return type will again be numOrStr and not string. The compiler is not able to change the return type as per the arguments passed.
There are a lot of consequences here, such as when we pass two strings as arguments, we know that the result should be a string and we can then call many string functions on the result. But here, we cannot do that.
Here, function overloads can help us. With the help of function overloads, we can tell the compiler at compile time to call a specific version of that function. A version is just a signature of a function that includes argument type and return type.
See the following code.
type numOrStr = string | number;

function add(a: number, b: number): number; // version 1
function add(a: string, b: string): string; // version 2
function add(a: string, b: number): string; // version 3
function add(a: number, b: string): string; // version 4

function add(a: numOrStr, b: numOrStr) {
   if (typeof a === 'string' || typeof b === 'string') {
      return a.toString() + b.toString();
   }
   return a + b;
}
The compiler now knows that if we pass two numbers as arguments the return type will be a number and if we pass two strings as arguments the return type will be a string, similarly with all other versions.
const result = add('John', ' Doe'); // output - string
const result = add(1, 2); // output - number
Optional Chaining and Null Coalescing
Let's say we have an application that extracts data in the form of an object from a backend or a database or from some third party API. The data looks something like this:
const result = {
   name: "John Doe",
   address: {
      present: {
         city: "Banglore",
         state: "Karnataka"
      },
      permanent: {
         city: "Mumbai",
         state: "Maharashtra"
      }
   }
}
If we want to extract the present address of a person then:
const city = result.address.present.city;
This single line of code is dangerous because it assumes that in the API response all properties are defined. But that might not be the case every time. The problem is we don't know if a certain property is defined in an object or not. There are multiple solutions to the above problem:
- We can perform a check by nested logical statements.
- To avoid nesting, we can use logical operators all at once.
- We can even use try-catch blocks, to catch any error.
But to implement these solutions, we have to write a lot of code. Moreover, these solutions are error-prone. Typescript solves the problem by optional chaining. This is implemented with the help of the ‘?’ operator.
The syntax for using this is:
//  optional Chaining
a?.b;
The above code means that if ‘a’ is undefined or null then return undefined else return a.b
The optional chaining operator is equivalent to:
(a == null) ? undefined : a.b;
So, In our example, we can do the following changes:
const city = result?.address?.present?.city;
Nullish Coalescing:
It is somewhat similar to optional chaining. It is an operator “??” that gives a default value to an expression that evaluates to “null” or “undefined”.
const userInput = undefined;
const storedData = userInput ?? 'DEFAULT';

console.log(storedData);
Here, it means that if userInput is undefined or null then set the value to “DEFAULT”.
Remember that, nullish operator only works with undefined and null. Even empty strings will not work and will not generate output as DEFAULT.
Generics
In TypeScript, Generics are kind of a tool that allows us to write reusable and dynamic code that can work with any number of types instead of a single type. They help us in writing general forms of a function. These are also available in other programming languages like c++, java but not in vanilla JavaScript. As these are not available in JavaScript, we are not going to find anything in the generated JavaScript file after compilation. Generics are purely used for providing flexibility in writing type safety code. Let's say we have a function like this:
function identity(arg1: number, arg2: string): number {
   return arg1;
}
This function can only take a number as an argument and can return only a number. If we want to make this function somewhat expandable or general, By this we mean that it can take any type of argument and can return any type of argument. In such cases, generics come into play.
function func <T, U>(arg1: T, arg2: U): T {
   return arg1;
}
Angle brackets are used in generics. Here, “T” and “U” can hold any type of values(string, number, etc) and are assigned as argument type and return type. They are generally called placeholders that store value at runtime.
Now we call this function in any fashion like:
func("Hello", 1);
// or
func(21, 1);
// or
func(true, 1);
Remember that we can use any in place of generics but any is not type-safe. Moreover, we cannot force the compiler to return the same type as that received in the argument. Generics are not limited to only functions. We can also create generics classes as well. A generic class ensures that specified data types are used uniformly throughout the class.
class someData<T> {
   private data: T[] = [];

   addItem(item: T) {
      // some code
   }
   removeItem(item: T) {
      // Some code
   }
}

const someText = new someData<string>();
someText.addItem('John Doe');
Also, we can have our own generics interfaces as well.
For example:
interface Xyz<V, W> {
    id1: V,
    id2: W
}
We can assign them as return type or argument type in any function.
function func<T, U>(arg1: T, arg2: U): Xyz<T, U>{
    console.log(arg1 + ": " + typeof (arg1));
    console.log(arg2 + ": " + typeof (arg2));
    let identity: Xyz<T, U> = {
       id1: arg1,
       id2: arg2
    };
    return identity;
}
Module and Namespaces
Whenever the code base grows it becomes important to organize classes and interfaces for better maintainability and easy debugging. Also, in such cases, it is important to write modular code which simply means to split the code across multiple files so that each file stays manageable and maintainable on its own. We can then simply import and export from these files, by making sure that data from all these files remain connected during development. TypeScript modules allow you to achieve that. A module acts as a container for the code and helps to organize your code in a clean way. Splitting the code into multiple files is very important in development. For that, we have three main techniques.
The first technique is to simply write multiple code files, TypeScript will then automatically compile all code files in the source directory. We need to manually import them to compiled JavaScript. However, this approach is quite cumbersome and error-prone. You have to manage all the imports manually. For smaller projects, this technique can be used but for bigger projects, this is time-consuming and error-prone as well. So for bigger projects, the other two techniques are used i.e. Namespace and file bundling and ES6 modules:
The first one is Namespace and file bundling. The namespace is a typescript feature in which we can add special code to our source code, allowing us to group the code together below a namespace, and then import the namespace into other files. This also bundles the file together into one file. The advantage is that we write code in multiple files which are compiled, they are then imported into each other and therefore we have fewer imports to manage. To use namespaces, the namespace keyword is used.
The syntax for declaring the namespace:
namespace <namespace_name> {
   export interface a { }
   export class b { }
}
Please note that we can put anything inside namespace like classes, constants, functions, etc. We can put namespace in the separate file as well. Now, for importing the namespace we have the following syntax:
/// < reference path="namespace_file_name.ts"/>Let’s take an example:
NameSpace file: addition.ts
namespace addition{
   export function add(num1: number, num2: number) {
      return num1 + num2;
   }
}
Main file: app.ts
/// < reference path = "./addition.ts" / >
let sum = addition.add(5, 4);

console.log("Output: " + sum);
The second technique is to use ES6 imports and exports, also known as ES6 modules. In this as well, we do not need to manage all the files rather browsers understand it and automatically download and run the file, on which other files depend. We use import/export syntax in this case. Let's see an example.
The following code is written in Student.ts
export class Student {
   rollNumber: number;
   name: string;
   constructor(name: string, rollNumber: number) {
      this.name = name;
      this.rollNumber = rollNumber;
   }
   displayStudent() {
      console.log ("Student roll number: " + this.rollNumber + ",
         Student Name: " + this.name );
      }
}
To import a module, we use this syntax:
import { export_name } from "file path without extension"
So lets import in app.ts:
import { Student } from "./Student";

let studentObj = new Student("John Doe", 10);
studentObj.displayStudent();
Closing Notes
Now that we have learned the basics and most of the features of TypeScript, you are good to develop a project.
You can also contribute to our open source project- Node.js Backend Architecture Typescript.
Please, share this blog so that others can learn from it.
Keep Learning 🙂
Team AfterAcademy!!
Written by AfterAcademy Tech
Share this article and spread the knowledge
Read Similar Articles
AfterAcademy Tech
TypeScript Tutorial For Beginners
In this tutorial, We are going to learn about the basics of Typescript. If you are having any doubts, whether to use typescript over javascript or Do I really need it? then this article is for you. Learn the concepts behind Typescript and its necessity in today's world.
Janishar Ali
JavaScript Most Used Modern Features
JavaScript has evolved over the years. ES6 (2015) was a major milestone that introduced many important features. Since then, there have been minor but significant additions as well. These new features have transformed the way we write code in JavaScript.

AfterAcademy Tech
Chrome V8 Engine - Javascript runtime for Node.js
Chrome V8 engine originally run in Chrome web browsers. But later it was used to run the javascript without a browser. Node.js is written in C++ and build on top of Chrome V8 engine, which provides the runtime for the Javascript.

AfterAcademy Tech
Most used Javascript ECMAScript 2015 (ES6) and ECMAScript 2016 (ES7) features
ES6 brought the most profound changes to the javascript. It completely reshaped the way we approach to javascript. ES7 was a tiny update on top of ES6. Let’s see the changes that were brought in the ES6 update.